
DivX4 Settings
You can select the DivX4 codec as you would select any codec. Select Video - Compression, then select DivX4 from the list.
Once you've selected it press the Configure button to configure the codec.
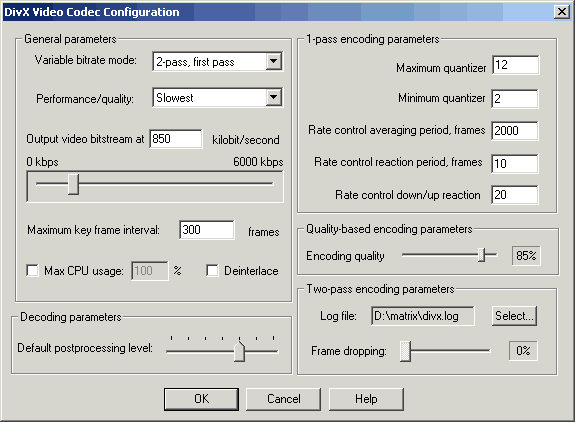
Here we have a load of different settings.
Let's start in the General parameters section.
There's 3 different encoding modes:
1-pass : The codec will try to stay around the bitrate you set as good as possible. It doesn't actually mean that it's true CBR, but demanding scenes will get less bitrate than they would get in a true VBR mode. The codec will automatically adjust the compression level for each frame according to the amount of motion it detects.
1-pass quality based: In this mode you cannot select any parameters beside the Encoding quality. Each and every frame will be compressed the same amount. Hence this could be considered a sort of constant bitrate encoding (CBR) mode.
2-pass, first/second pass: DivX4 supports 2 pass VBR encoding, much as in SBC. When you set it to 2-pass, first pass then the codec will create a log file which you can specify in "Two-pass encoding parameters" on the bottom right during the first pass and an unusable small AVI file. After having created the logfile you set the codec to 2-pass, second pass and you encode the movie again. This time you'll get a usable output AVI. This mode also pretty much guarantees that you get the filesize you want. Clearly, 2 pass encoding will give you the best quality as well, but it takes twice as long to encode.
Performance/Quality: This represents how much time the codec spends on compressing each frame. The slower the codec works, the better the quality. I suggest you always leave it as slowest as this gives the best quality. If you want to use the codec for real-time capturing you should set it to fastest instead. This parameter represents the motion search accuracy. When you set it to fastest motion search is completely turned off, giving you an analog of MJPEG with inter frame control added. The higher speed the lower quality (at the same bitrate). Setting it to fastest will also turn off the scene change detection.
Output video bitstream: As in the old DivX codec this is where you put the bitrate. As in the old codec you have both a field where you can enter numbers manually or a slider which you can move to set a bitrate.
Maximum keyframe interval: DivX4 is a VKI codec. This means that it sets keyframes at scene changes automatically which is the best way to place keyframes as they are significantly larger than other frames and a scene change creates large frames anyways. In order to offer better fast forward / backward you can this value which will insert a keyframe manually if the scene change detection hasn't kicked in. The default is 300 frames. Divide that by your framerate and you know how many seconds without keyframes the codec will go. Normally you wouldn't have to touch this value as the scene change detection kicks in way before this counter has run out. Do not misunderstand how it works: if the scene change detection hasn't inserted a keyframe for 300 frames since the last keyframe one will be inserted manually and the counter will be restarted. Then once the scene change detection kicks in again this counter will be reset again.
Max CPU usage: This can be turned on to ensure that the encoder gets to use the maximal CPU time. Since all encoding applications will hog the CPU anyways this is of no practical use to us.
Deinterlace: Will deinterlace the video stream but if your stream truly has to be interlaced you better use a filter in your encoding application (Smart Deinterlacer for VirtualDub) than use the built-in deinterlacer of the codec.
Then the decoding parameters:
Default postprocessing level: Unlike DivX3.x DivX4 offers you the ability to set a default playback filtering level during encoding. Never more will you have to right click in WMP, select properties, advanced, the DivX codec and finally get to that magical slider that can make a lot of blocks disappear (and make playback much slower in low-end machines). You can check the help file to see what de-ringing and de-blocking, the magical two options that are influenced by this setting, do exactly. A setting of 0 means no filtering is enabled. Then the filtering gets progressively stronger and at the maximum setting you can clearly notice that the movie is less sharp, and much blurrier. I suggest you use a range of 2-4 here, depending on your own liking.
Now to the other settings and their influence on the various encoding modes:
Quantizers: The quantizers have the largest influence on filesize, especially when you select 1-pass encoding. If you're familiar with Nandub, there they are called DRFs instead but basically it's the same thing.
Minimum quantizer: Minimum compression level a frame can get. Lower numbers give a better overall quality but also less predictable and larger sizes. For a single CD rip using 1-pass encoding you may want to go up till 4 here. If you see blocks in the preview window you should consider lowering this value.
Maximum quantizer: The upper limit for the compression level. The higher this number the more compressed will the frames get, which results in a lower filesize but also in worse looking frames. In 1-pass encoding you'd normally try to go lower than the default of 12, but the lower you go the greater the risk to get an oversized movie.
If you set min quantizer = max quantizer all other rate control parameters become irrelevant. It will give you the same as setting the Variable bitrate mode to 1-pass quality based. If you set min quantizer > max quantizer every frame will be encoded at max quantizer.
Rate control averaging period: How many frames the codec will look at the determine the bitrate of the frame to encode. If previous frames have used much bitrate the codec has to average that by giving upcoming frames less bitrate so it can keep the bitrate you set. The default 2000 seems a pretty reasonable value, but you can experiment with higher setting and you may find that they give better results. Setting it higher will decrease the ability of the encoder to adapt to low/fast motion scene changes and you may not get a predictable size anymore.
Rate control reaction period: Indicates how fast the codec will react to recent scenes. Large values mean the codec will adapt to new demanding scenes quickly but that will result in worse looking low motion scenes. Keep it at the default of 10. RCR affects how fast the quantizer will be updated due to complexity changes. High values will smooth the quantizer curve (resulting in a smoothed quality curve as well).
Rate control up/down reaction: Motion detection sensitivity, much like in Nandub. The lower this value the more sensitivity to changes in the amount of action in the movie the codec will be. If you set this too low the codec will constantly use many bits since it thinks the scene is demanding and you can end up with an oversized file. The default 20 seem to work just fine. Large values can also slow encoding down. This parameter kicks in when high motion scenes force the bitrate control module to lower the quality of the picture (equals increasing the quantizer) and it slows down further quality decrease. If you use very high values here you might end up in a situation where the codec doesn't go above/below the median of the two values anymore.
All these "right side" settings are pretty important in 1-pass encoding, in 2 pass encoding they don't have much of an influence and you better leave them alone.
When you use 1-pass quality based encoding, setting the only available parameter: Encoding quality to 85% will give you a bitrate of roughly below 800kbit/s. Higher values will quickly give you pretty large files so be careful when you move the slider.
When you use 2-pass encoding there's another parameter which you can use: Frame dropping. If you activate it the codec will drop certain frames when it thinks they're not needed. Do NOT use this feature. The codec will automatically give less-important frames less bitrate so we don't really need it, it will only lead to synch problems and choppy playback. The log file should be self-explaining, press the select button and select a name and path for the first pass log file.
Note that it's possible to use the same first pass log file for several encoding sessions, but if you change the bitrate you will slowly use size predictability (depending on how much the bitrates used in first and second pass differ). In any case you should use the same performance/quality settings. Generally the files you will get from 2 pass encoding will match the values your bitrate calculator will give you.
I hope by now you're convinced that 2 pass is the way to go. So configure the codec for the first of the 2 passes, then close the codec configuration window by pressing OK, then OK again to close the codec selection window. Now press F7, give the file a name but before you press OK you check the checkbox at the bottom of the window:

This will prevent VirtualDub from starting to encode immediately. Now go back to the codec setup, do not change any values but select 2-pass, second pass from the Variable bitrate mode dropdown list. Then press OK twice again and press F7. Select the same name and once again check "Add operation to job list and defer processing". Now press F4 which will bring up the joblist:

Now all you have to do is press Start and you're all set.
And now some technical info about the 2 pass mechanism:
During the first pass the movie is encoded in regular 1-pass mode and the following information is written to the logfile: if a frame was keyframe or delta frame, what quantizer was used, how many bits were used on texture coding, how many on motion vectors and how many bytes per frame in total. And here's a sample line:
Frame 103516: intra 0, quant 2, texture 10348, motion 1960, total 16245
Upon starting the 2nd pass the codec tries to open analyse.log. It will write:
Total frames: 243767 Non-zero decisions: 243767 Avg quantizer: 6.971653
The first number is the total number of frames of the clip, the 2nd value the number of non dropped frames (should always be the same unless you use the frame dropping parameter which you really shouldn't) and the average quantizer that will be used to encode the movie in the 2nd pass. Then it will write something like this for each frame:
Frame 103516: PRESENT, complexity 25869, quant multiplier 0.500000, texture 2376, total 5471
Progress: expected 4265299248, achieved 4138620302, dq 0.913520, new quant 5
The first number is the framenumber, the 2nd indicates if a frame has been encoded (PRESENT) or dropped (SKIPPED), then the 3rd value represents the change from one frame to another (if you have two almost similar frames this value will be close to 0, if you have a lot of action the value will be high). The 4th parameter depends on the complexity (lower complexity = lower multiplier), then you get the number of bits used for texture and for the whole frame. The 2nd line refers to the frame that is to be encoded next. Expected and achieved show how well the codec bitrate prediction worked so far, ideally they should be close to each other (if they match you have perfect size predictability). dq is another quantizer multiplier used for rate control (in the example we are below 1.0 so we have to decrease the quantizer a bit). And the last field is the quantizer that is to be used for the next frame.
>> BACK