DivX4log guide
Start up DivX4log and press F2 to load your first pass stats file (normally called divx.log).
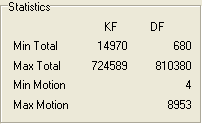
DivX4log will show you some stats about the file you just loaded:

 In
the common section change the framerate to 24 if you have an NTSC source. Also
note the BitRate. This value is very important. You want to match it to the
value that GKnot gave you.
The Quantizers' limits part of the main window is where you'll see the results
of your changes.
![]() In the beginning
you won't find much interesting info here.
In the beginning
you won't find much interesting info here.
The first thing you have to do is create a new zone for the end credits.
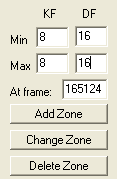 Enter
the start frame of your end credits in the At frame: field, then press Add Zone.
![]()
It's time to explain zones a bit more. A zone is a range of frame that is characterized by a start and an end frame. Furthermore each zone has 4 additional attributes: Min keyframe (KF) quantizer, Max keyframe quantizer, Min delta frame (DF) quantizer and Max delta frame quantizer, displayed in the order I mentioned them. You can find more info about keyframes and delta frames (which correspond to P-frames in this context) in the glossary. A quantizer is basically a compression factor, the higher the number the more compressed a frame is.
Now mark the end credits zone by clicking on it, then set the Min and Max for KF to 8 and Min and Max for DF to 16 and press Change Zone. You'll see that the 4 values have changed accordingly:
![]()
The next thing to do is select a quantizer distribution rule.
 First
set the DF Source. If you set this value to Motion the motion values will be
used to calculate a compression factor for all frames (equals to motion based
curve modulation in Nandub), if you set it to size the first pass size will
be considered for each frame to calculate the scale factor. Set DF source to
Motion. The trim factor can be used to flatten the curve a bit but that's a
fine-tuning measure and should only be used at the end of the process.
Now the DF Rule: Linear means that the bits are distributed to the frames as a linear function of the detected motion (or first pass size if you set DF source to Size). For a movie that has many still and not much action scenes you should set DF rule to Square, which will result in scenes with few motion won't be compressed very much and thus look very good. However, this won't leave as much bits for the high motion scenes, so in case of a high motion movie you should set the rule to root instead which will prefer high motion frames, but take away some bits from low motion frames.
You can configure a similar rule for keyframes but here the first pass size is the source for the bits/frame calculation as every keyframe has motion zero. I suggest you set this rule to linear (program default).
Now we want to split the movie into different zones depending on the amount of motion and then try to improve quality in difficult scenes by allocating more bits to these scenes. Here, the split settings come into play:
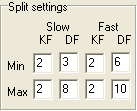 By
now you should be familiar with these fields as the correspond to the fields
you used to create a highly compressed zone for the end credits.
Change the Slow (corresponds to low motion parts of the movie) and Fast (corresponds
to the high motion parts of the movie) quantizers according to your needs. To
the left you can find an example of rather restrictive minimum quantizers (2
as both minimum and maximum for keyframes in low and high motion parts), but
relatively relaxed delta frame constraints. But we can still change these later.
Now select Action - Autosplit.
 Averaging
radius indicates over how many frames the quantizer values will be averaged.
Frame step indicates the accuracy of these calculations. The default of 5 will
analyze every 5th frame to speed up the process. For a more accurate analyzation
reduce this number.
Then press OK.
Let's have a look at the results:
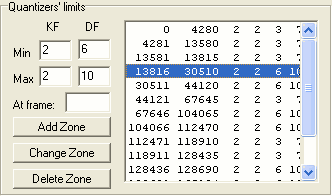 As
you can see DivX4log created a bunch of zones having the properties as we specified
them. As you can see keyframes all have a quantizer of 2, and the maximum delta
frame quantizer is 10.
Now have a look at the bitrate value:

For this movie we need 644kbit/s so we're not quite there yet. Now you have
two possibilities. You could either use more restrictive global quantizer settings
and use the auto-split function again, thus globally redistributing quantizers,
or you could do it locally by selecting a zone (click on it) and change the
quantizers in the Quantizers' limits part of the window, then press apply to
apply your settings by pressing Change Zone. If the actual bitrate is far away
from the target bitrate you should use the global settings, and if you're getting
close to the desired bitrate use the local quantizers. In the example case I
would suggest using the global options, restrict the max DF quantizer for low
motion frames to 4 or 5, and then also lower the DF quantizers for high motion
parts. Then use Action - Autosplit again to create new zones in function of
your new settings. When you're getting close to the desired bitrate start using
the local settings instead. To fine-trim the bitrate use the Trim by value for
the DF source:
 Increase
the Trim by value to get closer to the target bitrate.
Last but not least let's discuss a complicated case. As this involves logfile
Analyzation, manually creating and changing zones and finally performing a 3rd
pass you may want to jump this section for now and come
back here if the results of the 2nd pass should not be satisfactory. Assuming
you did everything according to plan and you get an output file that has the
right size but that doesn't look good in certain scenes. We can try to fix that
manually by creating a new zone and use the local quantizer settings to increase
quality in that particular scene (of course this requires that you take bits
away from other scenes).
For instance, an explosion scene starting at frame 122168 looked pretty ugly after encoding the 2nd pass. If you have a look at analyze.log (the 2nd pass logfile) you can see why:
Frame 122168: PRESENT, complexity 278531, quant multiplier 0.548546, texture
13320, total 30867
Progress: expected 2932435108, achieved 2753546681, dq 0.827927, new quant 5
Frame 122169: PRESENT, complexity 203239, quant multiplier 0.500000, texture
4949, total 11291
Progress: expected 2932454162, achieved 2753557972, dq 0.827921, new quant 7
Frame 122170: PRESENT, complexity 811462, quant multiplier 1.250000, texture
95688, total 95688
Progress: expected 2932491284, achieved 2753653660, dq 0.827976, new quant 7
Frame 122171: PRESENT, complexity 646439, quant multiplier 1.250000, texture
67780, total 67780
Progress: expected 2932528406, achieved 2753721440, dq 0.828006, new quant 7
Frame 122172: PRESENT, complexity 649262, quant multiplier 1.250000, texture
67042, total 67042
Progress: expected 2932565528, achieved 2753788482, dq 0.828035, new quant 7
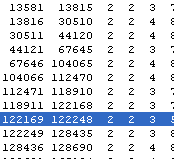
The delta frames have been encoded using quantizer 7 which apparently is too high. The explosion ends at frame 122248. Using the At frame field and the Add zone button you can create a new zone that contains these frames, then use the local quantizer settings and the Change zone button to set lower quantizers for that particular scene. Here's an example for what I did to make this particular scene look better: I created a new zone starting at the keyframe where the scene starts and ending at the keyframe where the scene ends (by entering 122168 and pressing Add Zone, then entering 122248 and pressing Add Zone, then selecting this scene and set the Max DF quantizer to 5 and pressing Change scene):
Unfortunately this kind of manual editing requires that you perform a 3rd encoding pass after the 2nd pass has been completed.
Once you're done press F3 to save the logfile. Make sure you use another name. When you get back to the DivX4 codec configuration make sure that you set the codec to use the new logfile.
>> BACK