
DivX5 encoding in VirtualDub
Start up VirtualDub, press Control-O to load the avs file GKnot has created for you.
Then set the video mode to Fast recompress by selecting the Video menu and clicking on Fast Recompress.
Then go to the same menu again and select Compression, or simply press Control-C.
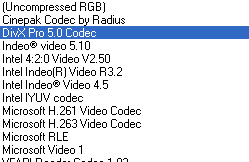 Select
the DivX Pro 5.0 Codec or DivX 5.0 Codec depending on what you installed from
the list of codecs. Then press the configure button to configure the encoding
session.
Select
the DivX Pro 5.0 Codec or DivX 5.0 Codec depending on what you installed from
the list of codecs. Then press the configure button to configure the encoding
session.
 As
its predecessor DivX5 has 3 encoding modes:
As
its predecessor DivX5 has 3 encoding modes:
1-pass: In that mode the codec tries to respect the given bitrate as good as possible while giving complicated scenes more bits than less complicated ones.
1-pass Quality Mode: In this mode each frame will be compressed equally. As you move the slider you can see the average quantizer your frames will get. This mode is best used for later editing as it keeps a constant quality over the movie.
2-pass: The 2 pass encoding mode will first process the video data in a first pass and analyze it. In a second pass this analyzation data is being used to encode the movie more efficiently while respecting the given bitrate (more accurately than 1 pass VBR in general). This is the mode to go if you want to achieve a certain size in the end so this is the mode we're going to use.
Set the Variable Bitrate Mode to 2-pass, first pass and enter the desired bitrate.
 Then
select a path and name for the logfile (the file that stores information about
the video data, this file is filled during the first pass and then used in the
2nd pass) and the MV file.
Then
select a path and name for the logfile (the file that stores information about
the video data, this file is filled during the first pass and then used in the
2nd pass) and the MV file.
The MV file contains motion vector data. This file will help speed up the 2nd
pass considerably since the motion compensation does not have to be performed
again.
The let's have a look at the MPEG-4 tools: These features are only available
in the Pro release.
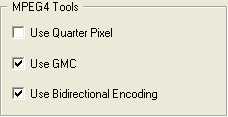 Use
Quarter Pixel: Using this setting will result in a resolution of a quarter pixel
for the motion compensation. This allows a better resolution for the motion
compensation as a block may sometimes move less than a pixel. I've been told
by the developers that this feature only seems to work well when you quarter
the size of the original video. I've tested it at the standard resolution of
640x and found that it creates weird effects so you should disable it.
Use
Quarter Pixel: Using this setting will result in a resolution of a quarter pixel
for the motion compensation. This allows a better resolution for the motion
compensation as a block may sometimes move less than a pixel. I've been told
by the developers that this feature only seems to work well when you quarter
the size of the original video. I've tested it at the standard resolution of
640x and found that it creates weird effects so you should disable it.
Use GMC: GMC stands for Global Motion Compensation. This setting helps with complex scenes where zooming or panning is involved but a large part of the image stays essentially the same.
Use Bi-directional Encoding: This allows for B frames in the output stream. Previously, all MPEG-4 codecs only used I (completely stored) and P (predicted) frames. B frames are bidirectionally predicted, that is you predict a frame in advance and then "predict backwards" which is of better quality than forward prediction. While predicting multiple frames in advance creates a processing overhead and the quality of the predicted frame gets worse the bi-directional frame will look better and you will have an overall increase in quality.
To summarize: You should activate GMC and Bidirectional Encoding, but not Quarter Pixel.
Then let's move to the general parameters.
Both Cropping and Resizing parameters are Pro features and not really needed in this context as Avisynth does the job for us.
 Psychovisual
Enhancements. The use of this feature will try to exploit the knowledge about
the human visual system to hide details that we won't see and give more bitrate
to details that we're very sensitive to. While the use of this feature should
result in a better looking video stream it could have negative effects when
you're comparing frames only. At the moment this feature is broken and should
not be activated.
Psychovisual
Enhancements. The use of this feature will try to exploit the knowledge about
the human visual system to hide details that we won't see and give more bitrate
to details that we're very sensitive to. While the use of this feature should
result in a better looking video stream it could have negative effects when
you're comparing frames only. At the moment this feature is broken and should
not be activated.
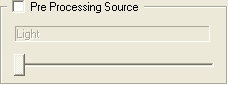 Pre
Processing allows you to perform spatial and temporal noise reduction. There's
4 basic settings here, the more screwed up your source is the more preprocessing
do you need. As I'm pretty opposed to any filtering that's not resizing I will
not use such operations and you shouldn't either unless you have a very noisy
source. Most DVDs of modern movies are pretty clean and don't need that kind
of preprocessing, but rather using it would "wash out the movie".
You can also configure this via the CLI parameters.
Pre
Processing allows you to perform spatial and temporal noise reduction. There's
4 basic settings here, the more screwed up your source is the more preprocessing
do you need. As I'm pretty opposed to any filtering that's not resizing I will
not use such operations and you shouldn't either unless you have a very noisy
source. Most DVDs of modern movies are pretty clean and don't need that kind
of preprocessing, but rather using it would "wash out the movie".
You can also configure this via the CLI parameters.
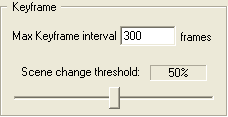 This
parameters should be well known to you. Max keyframe interval indicates how
long the codec will go without inserting an I frame. But normally you'd have
a keyframe inserted by the scene change detection after a certain time anyway,
this setting is just there to prevent extreme cases and ensure that seeking
is possible without too much delay (you always have to seek to a keyframe).
This
parameters should be well known to you. Max keyframe interval indicates how
long the codec will go without inserting an I frame. But normally you'd have
a keyframe inserted by the scene change detection after a certain time anyway,
this setting is just there to prevent extreme cases and ensure that seeking
is possible without too much delay (you always have to seek to a keyframe).
Use the default values of 300 frames and 50%.
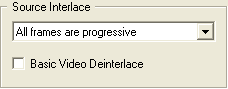 Normally
you do everything but rip your legs out to have progressive input so set this
to All frames are progressive.
Normally
you do everything but rip your legs out to have progressive input so set this
to All frames are progressive.
Then let's move on to the advanced parameters. You do not have to change these
5 parameters as the defaults work just fine. So skip the
explanation if you don't care.
 Quantizers:
The quantizers have the largest influence on filesize, especially when you select
1-pass encoding. If you're familiar with Nandub, there they are called DRFs
instead but basically it's the same thing. You should only touch these settings
if you're really familiar with how a codec works.
Quantizers:
The quantizers have the largest influence on filesize, especially when you select
1-pass encoding. If you're familiar with Nandub, there they are called DRFs
instead but basically it's the same thing. You should only touch these settings
if you're really familiar with how a codec works.
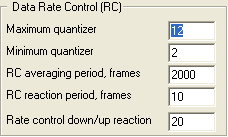
Minimum quantizer: Minimum compression level a frame can get. Lower numbers give a better overall quality but also less predictable and larger sizes. For a single CD rip using 1-pass encoding you may want to go up till 4 here. If you see blocks in the preview window you should consider lowering this value.
Maximum quantizer: The upper limit for the compression level. The higher this number the more compressed will the frames get, which results in a lower filesize but also in worse looking frames. In 1-pass encoding you'd normally try to go lower than the default of 12, but the lower you go the greater the risk to get an oversized movie.
If you set min quantizer = max quantizer all other rate control parameters become irrelevant. It will give you the same as setting the Variable bitrate mode to 1-pass quality based. If you set min quantizer > max quantizer every frame will be encoded at max quantizer.
Rate control averaging period: How many frames the codec will look at the determine the bitrate of the frame to encode. If previous frames have used much bitrate the codec has to average that by giving upcoming frames less bitrate so it can keep the bitrate you set. The default 2000 seems a pretty reasonable value, but you can experiment with higher setting and you may find that they give better results. Setting it higher will decrease the ability of the encoder to adapt to low/fast motion scene changes and you may not get a predictable size anymore.
Rate control reaction period: Indicates how fast the codec will react to recent scenes. Large values mean the codec will adapt to new demanding scenes quickly but that will result in worse looking low motion scenes. Keep it at the default of 10. RCR affects how fast the quantizer will be updated due to complexity changes. High values will smooth the quantizer curve (resulting in a smoothed quality curve as well).
Rate control up/down reaction: Motion detection sensitivity, much like in Nandub. The lower this value the more sensitivity to changes in the amount of action in the movie the codec will be. If you set this too low the codec will constantly use many bits since it thinks the scene is demanding and you can end up with an oversized file. The default 20 seem to work just fine. Large values can also slow encoding down. This parameter kicks in when high motion scenes force the bitrate control module to lower the quality of the picture (equals increasing the quantizer) and it slows down further quality decrease. If you use very high values here you might end up in a situation where the codec doesn't go above/below the median of the two values anymore.
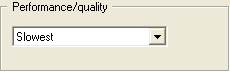 Performance/Quality:
This represents how much time the codec spends on compressing each frame. The
slower the codec works, the better the quality. I suggest you always leave it
as slowest as this gives the best quality. If you want to use the codec for
real-time capturing you should set it to fastest instead. This parameter represents
the motion search accuracy. When you set it to fastest motion search is completely
turned off, giving you an analog of MJPEG with inter frame control added. The
higher speed the lower quality (at the same bitrate). Setting it to fastest
will also turn off the scene change detection.
Performance/Quality:
This represents how much time the codec spends on compressing each frame. The
slower the codec works, the better the quality. I suggest you always leave it
as slowest as this gives the best quality. If you want to use the codec for
real-time capturing you should set it to fastest instead. This parameter represents
the motion search accuracy. When you set it to fastest motion search is completely
turned off, giving you an analog of MJPEG with inter frame control added. The
higher speed the lower quality (at the same bitrate). Setting it to fastest
will also turn off the scene change detection.
Data Partitioning is a new feature that can be useful for online transmission / streaming scenarios where errors occur but is not really useful for our kind of application so leave it deactivated.
Finally, the MP4 creator allows you to create MPEG-4 MP4 files. At this moment there's no way to add audio yet so this feature is not very useful but as I said there should be a tool that allows you to add audio to these files shortly.

Once everything is set press OK to close the codec configuration. Then press F7, select a filename and check Add operation to job list and defer processing.

This will prevent VirtualDub from starting to encode immediately. Now go back to the codec setup, do not change any values but select 2-pass, second pass from the Variable bitrate mode dropdown list. Then press OK twice again and press F7. Select another name and once again check "Add operation to job list and defer processing". Now press F4 which will bring up the joblist:

Now all you have to do is press Start and you're all set.
And now you may all be wondering about these CLI parameters I talked about. There's an overview page that will tell you everything about every parameter there is.
>> BACK
This document was last updated on 06/30/02