 After the first screen which you can just click thru you'll get here. Select Create a new project, give it a name and a path. Make sure that you have enough space left. As mentioned before FU takes quite a bit of space.
Fair Use Guide
You will need the following software for this guide:
Fair Use
BeSweet & BeSweet
GUI or HeadAC3heNandub
Judging by the explosively growing Fair Use forum and the number of questions concerning separate audio extractions I've been getting lately I can only conclude that this program has become one of the hottest on the DivX market so far and since a fully working audio part is still far away I decided to write an audio extraction guide. But why only do it halfway so here we go with a full Fair Use guide.
The concept behind FU
Despite the name 'FU' there's no profanity hidden in the program ;) It's the one-in-all program for MM4 and VKI DVD to DivX conversion. The only part which has to be done externally is audio decoding and the final joining of audio and video. FU will take the data directly off a DVD disc, but don't worry. At the very beginning the disc will be ripped to your harddrive and after the so-called indexing part you can remove the disc and you won't need it anymore until the audio has to be done. FU includes almost everything one could wish for: IVTC for NTSC sources, field aligning to remove interlacing artifacts in PAL, subtitles, IFO parsing, auto-cropping and an easy next / auto way to create your movies. Simply chose a program stream, subtitles, resolution, bitrate of the audio and the final size and press auto a few times and you have it. Well, almost. The program is still in beta state and is slow as hell. On a P3-550 it takes a good 24h for a regular less than 2h movie. So don't even think of trying that on your old 200MHz machine or you'll grow old before the program has finished. FU is also a very demanding program if it comes to resources.. it'll eat away more than 100MB memory when you create 4 streams at the same time and it'll push your system to the limit. Many people who overlocked their CPU had to find out that while their system would work alright normally it would crash under the load of FU. So don't blame the author, put your CPU back to normal speed and try again and most likely it will work.
Besides enough memory (don't even go below 128MB), a stable system (and keep in mind that W2K blasts away any other Microsoft OS when it comes to stability, and a reinstall on a regular basis might also not be a bad idea), a DVD drive, a lot of HD space (the whole DVD content will be copied to your harddisk, plus you create X video streams and in the end combine these streams to yet another one - so basically you'll need final-size-of-movie * number-of-encodings+1 + size-of-vobs on your harddisk) you also need to have a working ASPI layer. Should you get an ASPI error get and install Force ASPI from the software page.
Starting at release 0.30 Fair Use comes with a different encoding method that allows for contstant quality encoding based on a complicated model. It allows you to have about the same quality thruout the movie but you'll lose size predictability. More info as we proceed.
Step 1: Encoding the video
As mentioned before FU can currently only deal with the video part of a movie and it will extract the AC3 stream. But we'll deal with the rest later. Right now fire up FU.
After the first screen which you can just click thru you'll get here. Select Create a new project, give it a name and a path. Make sure that you have enough space left. As mentioned before FU takes quite a bit of space.
At a later point you may come back to Fair Use, maybe to add another encoding session, or to encode again with different parameters altogether. As long as you don't delete the .fud and .fup files on your harddrive you can still load the project after closing Fair Use.
 Here you'll select your DVD drive. If you get an error message here that means you don't have a working ASPI layer installed and you should download and install ForceASPI from my software page.
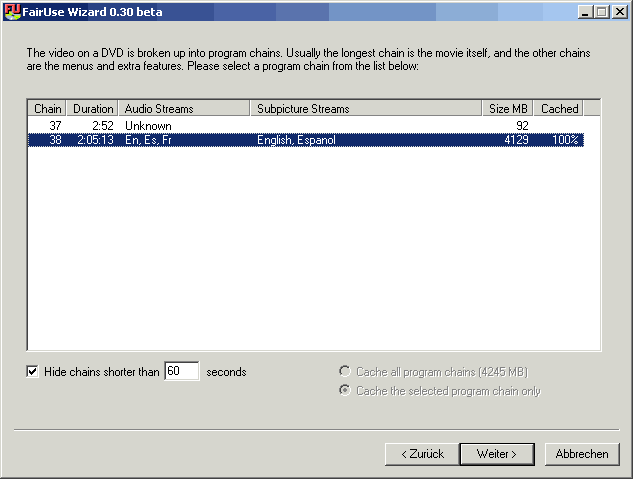 This screen allows you to select which title of the movie to encode. The longest chain is usually the main movie. You'll be able to verify if you've really chose the right one in one of the next streams and before you start encoding.
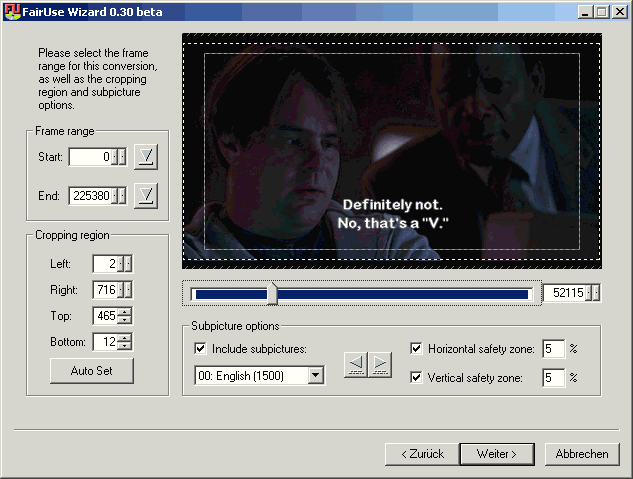 Here you can select a frame range to encode. Normally you'd just leave it to default. Press the Auto Set button and the program will automatically crop the movie properly. If you want subtitles now is the time to select them (check Include subpictures and select a stream). Selecting subtitles will also show the grey rectangle, which represents the safety zone which subtitles won't be able to cross (e.g. you don't get subs outside this rectangle). You can configure the safety zone using the Horizontal / Vertical safety zone fields. Also use the slider below the movie to move around and see if you have selected the right stream.
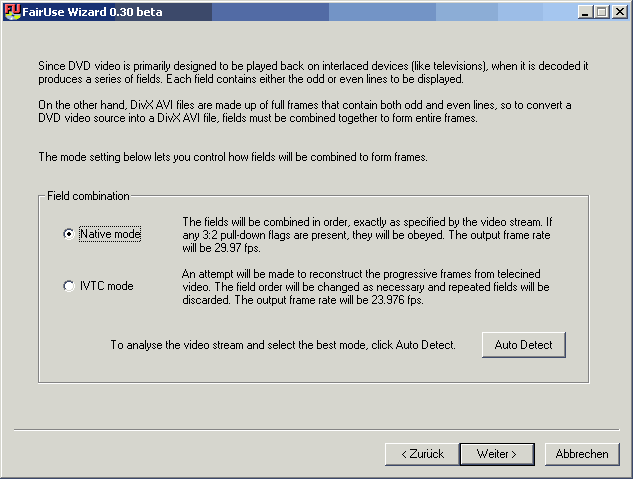 Probably not the most glorious but definitely one of the crucial screens. Here you can select one of the most powerful features of Fair Use: IVTC which will work even with some Anime titles. If you don't know what IVTC is don't worry, you don't have to know. Just press the Auto Detect button and press okay to whatever FU has to say.
When you're encoding a PAL movie there will be two other modes instead of the ones shown: Native mode and Field Align mode. Don't let this deterr you, the procedure is exactly the same: Press Auto Detect, then okay to what it comes up with.
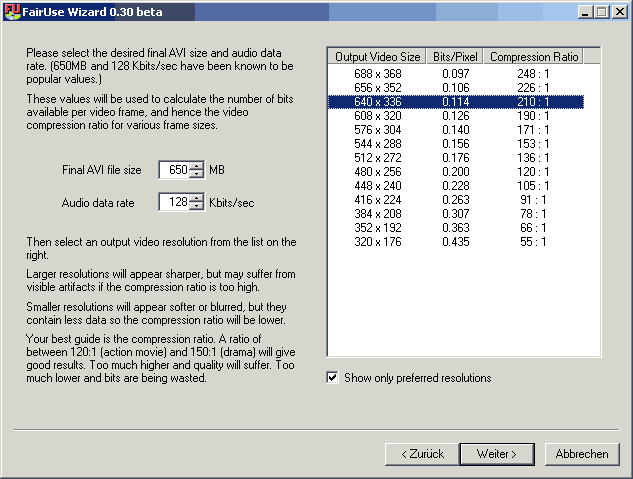 Here you enter the final size of your movie plus the audio data rate. Fair Use will stick very closely to this value so you don't have to worry about your file not fitting on the number of CDs you intended to put it on. Select a resolution which offers an acceptable compression ratio to you. The instructions say the compression ratio must be below 120:1 for action movie and 150:1 for a drama. The lower the compression rate the higher the quality of course.
Also, do not expect any wonders: a 3h movie on one CD will look shitty unless you select a very low resolution. Fair Use will do as good as possible to keep a constant quality given the parameters you set.
Why is your favorite resolution not available? FU tries to respect the aspect ratio of the movie as closely as it can but it can't stretch a movie. Therefore it will rather cut off a few pixels at the borders giving you slightly odd-looking resolutions at first sight.
 Here you can define how many files FU should encode. I've had pretty good results by just leaving it at the default of 4 and pressing Auto Add and unless you truly know what you're doing that's the way for you to go. In order to prevent problems during fast forward/backward FU will, in addition to the VKI on scene changes, also place keyframes after a certain interval and prevent too frequent keyframe insertion. These is done by the KF Min / Max parameters.
At the beginning there's no Audio encoding selected. Press the Add button to change that.
 Just select an audio stream from the list and press OK.
Then also don't forget to set the final size (CD size times the number of CDs) and the bitrate of your audio file.
Now we come to the delicate matter of Diff Tracking. Instead of using the regular FM and LM encoding you can use this mode and possibly achieve a higher quality but you lose size predicability so you have cannot specify the audio size just now. If you want to do this delete the auto-added encoding sessions and add your own Diff Tracking session(s).
If you press Next here the encoding will start. It will take a VERY long time, mind that. So you better make sure you don't need your PC for the next day or so.
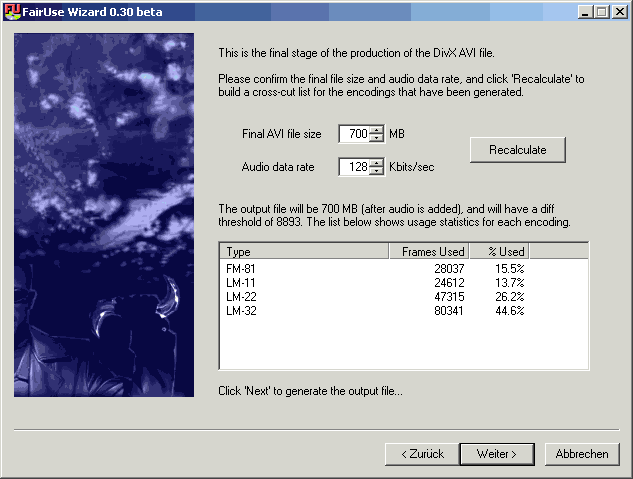 Normally after encoding you get a slightly different display here. You'd have an Avg.Diff column as well. In this case we have a diff threshold of 0 which means ypi can't do any better under the circumstances (no big deal: 700MB for one trailer is overkill). If you get a diff treshold below 11000 the result will be pretty good, between 11000 and 12000 the result will be acceptable and if it's above 12000 I suggest you allow for a larger output size, go back and define other encoding sessions (don't delete and of the created AVIs, they can still be used by FU) or reduce the audio data rate.
You'll have to press Recalculate before you can press Next which will create the final AVI according to the parameters displayed in this window.
And to reiterate this important point: FU doesn't favor Fast Motion at all. It just tried to keep a constant overall quality and while it's true that taking Low Motion for a certain scene might have made it look better the size would also have been increased, or you'd have to decrease the quality of another scene. FU does everything it can to deliver the best quality while respecting the constraints you put upon it.
Step 2: Decode AC3 to MP3
In order to get a direct AC3 to MP3 conversion in the highest possible quality using both azid and lame you can use either BeSweet or HeadAC3he.
Step 3: Join AVI and MP3
Now it's time to join AVI and MP3 in Nandub.
Step 4 : Splitting (optional)
If your output file is larger than a single CD you might want to split it up ;)