AVI to VCD / SVCD
First of all let's make one thing clear: Encoding from a non DVD source will give you a final result that's in no way comparable to a real DVDRip. Therefore I strongly suggest that you try to use the following procedures as few as possible and work with the DVD source material instead. And for those of you downloading DivX off the net: there's a vcd and SVCD scene too ;)
You'll need the following software in this guide:
TMPG
bbMPEG
BeSweet
BeSweet GUI (you'll need the latest betas of both tools, but only if you want to make an NTSC -> PAL conversion at the same time)
VirtualDub
Avifrate
Table of content:
0: Basic Setup
1: Optional NTSC -> Pal conversion
2: Encoding
3: Multiplex and Split
4: Burn
Step 0: Basic setup
Play your AVI in Windows Media Player 6.4 (c:\program files\windows media player\mplayer2.exe). During playback right click on the movie, and select statistics:
 Then look at the Actual rate. It will normally fluctuate a little, especially if you have a lot of other tasks running in the background (in this case I had TMPG running so my CPU was maxed out). In any case, if it's around 23-24fps the source has a framerate of 23.976fps. If it's around 29-30fps it's framerate is 29.97fps and if it's around 25fps it's actually 25.00fps.
Then there's another important issue: The audio format. Especially DivX AVIs often contain VBR MP3 these days. As Avery Lee has established AVIs with VBR MP3 have some serious problems, especially when it comes to editing them. There's basically not quite valid. There's an easy way to find out if you have such an audio track: Load the AVI into VirtualDub 1.4.8. If you get the following warning message your AVI contains a VBR MP3 audio track.

So, if this is the case you've just opened the right program ;) Press OK, then go to the audio menu and set audio to full processing mode.

Then select File -> Save WAV to save the audio track as an uncompressed WAV file to your harddisk. This is necessary because hardly any program can handle the included audio track in the AVI but if we use the extracted version there are no problems.
Then there's another important issue. I pretty much wasted a day working on this and I ended up having choppy movies all the time. Then, when I tried CCE as encoder it would complain about not being able to find a decoding filter for div3 (DivX3) even though I was able to play the movie just fine in WMP. So I ended up installing DivX3 and have it decode my video files and from that point on all my choppyness problems were gone.
Step 1: NTSC -> PAL conversion (optional)
This only applies if you have an NTSC (23.976 or 29.97fps) video and want to convert it to PAL format because your standalone does not support NTSC framerates. 29.97fps are currently also not supported in this mode as you'd have to IVTC them (experienced TMPG users know how to do that, but TMPG's auto-IVTC will most likely fail because these sources are often deinterlaced, so you have to find a working IVTC sequence on your own).
Start up Avifrate and load your AVI file by pressing the folder button on the left side.
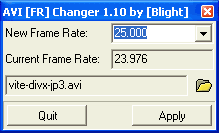 As you can see the actual framerate is exactly 23.976fps which is good. If it weren't, write this number down. Then select 25.000 as new framrate from the dropdown list and press the Apply button, then close the program again.
Then start up the BeSweet GUI and press the BeSweet button:
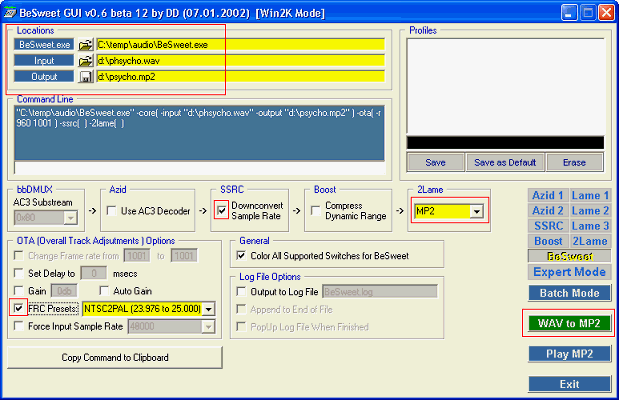
First of all you need to configure the locations. Select your BeSweet.exe file, the input WAV and the file you want your output written to. Also check Downconvert Sample Rate, then press the SSRC button on the left and check Set Sampling Rate of Output File to 44100 Hz (that's the only green option in the SSRC screen). Also note that most players actually support 48KHz audio because the DVD specs require it for DVD playback so if this is the case you don't have to bother with SSRC (why do something that will lower quality and take time if not necessary?) and don't have to check Downconvert Sampling Rate. Then also press the 2Lame button and check the 3 options that are colored in green. Encoding mode should be set to stereo, the total bitrate must be 224 kbit/s for VCD and must not exceed 224 kbit/s for SVCD. Last but not least add error protection should also be checked.
Once this is all done, check FRC Presets (on the left) and select the NTSC2PAL
(23.976 to 25.000) from the list. If the framrate wasn't exactly 23.976fps you
can check Change Frame rate from... instead of the FRC Presets and enter the
actual framerates (for instance 23.9762fps would give 239762, and then you have
to adapt the target framerate, so in this case 250000). Then press WAV to MP2
and let BeSweet do its job.
Step 2: Encoding
Start up TMPG, then load your AVI as Video Source (press the Browse button right to Video Source and select the AVI file). If you get the following message you probably don't have the DivX3 playback filter installed. I only got this error until I did so. And it also certainly means that your AVI contains a VBR audio track. If for whatever reason you should be unable to get rid of this message by installing DivX3 (make sure it's also used for playback, do a Start -> Run -> "regsvr32 divxdec.ax" and if you're asked whether the DivX4 filter should be used to play DivX3 content answer No), then there's a workaround: Load the AVI in VirtualDub again, set Video to Direct Stream Copy, Audio to No Audio, and save the AVI (press F7) to another file which you're then going to load into TMPG.

Once the file is loaded you're at a crossroad: If you extracted the audio in step 0, you load that WAV file as audio source.

That's how it looks when you use a separate audio track. By default TMPG will put the Video source in both Video Source and Audio source field so if you have no external field you'll have the same file in both fields. Also select the name of your desired output file.
Then set up TMPG properly and encode
the movie.
Once TMPG is done encoding you'll either have an mpg file or a m1v (VCD, with
NTSC to PAL conversion) or m2v (SVCD, with NTSC to PAL conversion) file.
 If
you have an mpg file go to the TMPG MPEG Tools (File -> MPEG Tools), click
on the Simple De-multiplex tab, press the Browse button on the input line, load
your mpg file then press Run. You'll end up with an .mp2 audio file and an .m1v
file if the input was a VCD stream or an .m2v file if the input was a SVCD stream.
If
you have an mpg file go to the TMPG MPEG Tools (File -> MPEG Tools), click
on the Simple De-multiplex tab, press the Browse button on the input line, load
your mpg file then press Run. You'll end up with an .mp2 audio file and an .m1v
file if the input was a VCD stream or an .m2v file if the input was a SVCD stream.
Step 3: Multiplex and split
bbMPEG will help you join the video and audio files and split the output over a number of CDs.
Step 4: Burn
All that remains to be done is burn the movie. If you
use the right program from the offered selection you can even create chapters
for your movie.
This document was last updated on 07/28/02