DVD2AVI & MPEG2DEC
A recently released MPEG-2 decoding plugin for Avisynth makes it possible to speed up DVD2AVI frameserving quite a bit by keeping the video data in the DVD-native YUV2 colorspace (VFAPI operates in RGB so everything has to be converted which of course takes time). Furthemore, combined with a MMX optimized Avisynth version, we can expect a considerable performance gain. On my machine I got 4 fps more using this combination to encode a DivX compared to the results using the traditional VFAPI way. But while it's faster it's also yet another level of complexity so unless you're familiar with the VFAPI way (explained in every guide that uses DVD2AVI) I suggest that you do not touch this method.
Since we're going to use avisynth in this tutorial, and not only as a simple frameserving mechanism but to crop and resize as well I strongly suggest that you visit the Avisynth homepage and check out the Avisynth tutorial and the Avisynth scripting reference. While you can get along without having read these it's as with any advanced program: You can only properly master it by having RTFM!
You need the following software in this guide:
Avisynth
DVD2AVI 1.76 or later
MPEG2DEC Avisynth plugin.
Now let's get started
Step 1: Create a DVD2AVI Project
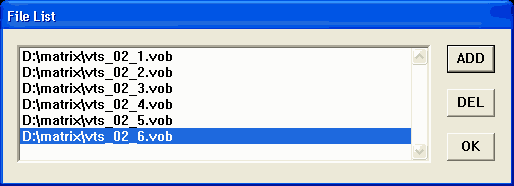
At first you'll have to load your VOB files. If the files are consecutively named selecting the first VOB will load all the others.
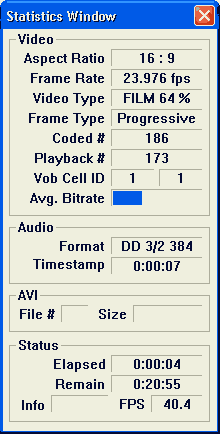
The next step is finding out what kind of movie we're dealing with. Press F5 to start the preview. Let it run for a bit and watch the status window.
 Here's
two thing you may want to write down: The first is Aspect Ratio. Here you'll
either get 16:9 or 4:3. The other is the frame type.
Here's
two thing you may want to write down: The first is Aspect Ratio. Here you'll
either get 16:9 or 4:3. The other is the frame type.
Frame Rate = 25.000 fps: your source is PAL and you can skip the following step.
Frame Rate = 29.970 fps: Let the preview run for a couple of minutes, then take a look at the Video Type: If it's FILM at a percentage higher or equal to 95% you can activate Forced FILM as shown below. Otherwise you will have to perform IVTC.

The next step is audio decoding. Depending on your favorite audio decoder you can let DVD2AVI decode your audio track.
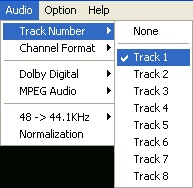 As I prefer
to let Graphedit do this task I always select None here. Just select the right
track if you want DVD2AVI to decode the audio. If you need downsampling you
can activate downsampling in the 48 -> 44.1KHz submenu. I suggest you use
High quality when using that feature.
As I prefer
to let Graphedit do this task I always select None here. Just select the right
track if you want DVD2AVI to decode the audio. If you need downsampling you
can activate downsampling in the 48 -> 44.1KHz submenu. I suggest you use
High quality when using that feature.
Finally in the Dolby Digital submenu activate decode.
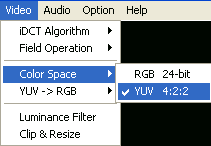
Now we have to make sure that the video data stays in YUV format. Make sure
that YUV is checked, otherwise we're going to lose our speed advantage.
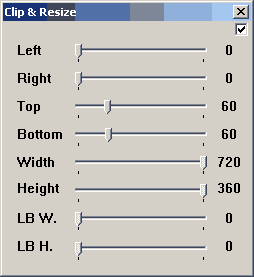
The next step is finding out the parameters for the cropping operation which we're going to perform later on (not that VCD&SVCD creation don't need this). Move the slider of DVD2AVI to a position where you can see a picture, then activate the Clip & Resize window from the Video submenu and check the checkbox in the upper right of the window:
 Note that certain
options of this window don't work, but they eventually will in the next full
release.
Note that certain
options of this window don't work, but they eventually will in the next full
release.
Move the Top and Bottom sliders until the black bars on top and bottom have disappeared. Unfortunately it's not possible at the moment to crop by 1 pixel, so if you thing that one value leaves a black line and a higher value crops into the picture just take the value in the middle.
The values shown in the screenshot are for a 1:2.35 16:9 movie, but not all movies are transferred in the same way so you better do this step instead of just using some values you found somewhere on the web.
Once you've found the right values uncheck the checkbox again.
Now you'll just have to create a DVD2AVI project file which can then be processed further.
Step 2: Avisynth setup & script creation
First of all comes the installation. After unpacking you have to copy AVISYNTH.dll to the following directory:
Windows 9x/ ME: c:\windows\system
Windows NT / 2000: c:\winnt\system
Windows XP: c:\windows\system32
Then double click on install.reg and just to make sure reboot your machine.
Now let's verify that Avisynth is properly installed by creating the following script:
AviSource("c:\temp\test.avi")
Type this line in Notepad, then save it as c:\test.avs. Make sure that the filetype field in the save dialog box says All Files (*.*) and NOT Textfile (*.txt). Now right click on c:\test.avs in explorer, select open-with and select the Media Player from the list. If it plays, everything is good and we can proceed.
To load the MPEG2Dec plugin you have to use the LoadPlugin command and give it the full path and filename of the plugin to load as argument. The next step is loading your DVD2AVI project file using the mpeg2source command. Note that MPEG2Dec provides this function so if you forget LoadPlugin it won't work. The following is a sample scrip which simply opens the d2v file.
LoadPlugin("c:\temp\MPEG2DEC.DLL")
mpeg2source("D:\matrix\matrix.d2v")
If you load this script into any encoding program that can read avs files you'll get the output of DVD2AVI, that is the decoded MPEG-2 data without any resizing applied (so the aspect ratio will be off).
The next step is cropping. You can skip it for SVCD creation. Now the values you wrote down when working in DVD2AVI become useful again. Cropping works by the use of the Crop function in Avisynth. It takes 4 arguments: Left, Top, Horizontal output size and vertical output size. Here's an example which crops a 16:9 1:2.35 NTSC stream:
Crop(0,60,720,360)
This will crop the top 60 line of the video, plus the bottom 60 lines (remember that the video stream originally was 720x480, so if you crop the top 60 lines away and take the next 360 lines that cuts off the bottom 60 as well - 60 (black) + 360 (video) + 60 (black) = 480) If you add this line to the script above you'll now get a 720x360 video stream which has no black bars, just the video data.
DivX resizing
Now we come to the last operation: resizing. Avisynth offers both Bilinear and Bicubic resize. Bicubic is more accurate and hence slower, and it should be used for higher quality output (2 CD DivX and SVCD). The arguments are the same for both resizing methods: You specify horizontal and vertical output size. For instance to resize your video stream to 640x272 using Bilinear resizing you'd add the following line to your script:
BilinearResize(640,272)
For Bicubic Resize the line would be: BicubicResize(640,272).
So a full script that would load the d2v project, crop and resize it to 640x272 would be:
LoadPlugin("C:\temp\MPEG2DEC\MPEG2DEC.DLL")
mpeg2source("d:\matrix\matrix-unresized.d2v")
Crop(0,60,720,360)
BilinearResize(640,272)
Note: It's also possible to do resizing and cropping using the regular filters. In order to do this simply place all the crop parameters after the resize parameters. Example:
BilinearResize(640,272,0,60,720,360)
SVCD resizing
As mentioned before here no cropping is necessary. But once again we have to do the letterboxing on our own. As people who have used VirtualDub for SVCD frameserving already know what we have to do is to resize to 480x362, then add some black bars. To add black borders we use AddBorders which takes the following 4 arguments: left, top, right and bottom. In Avisynth language that would become the following:
BicubicResize(480,360)
AddBorders(0,60,0,60)
So the script would become
LoadPlugin("C:\temp\MPEG2DEC\MPEG2DEC.DLL")
mpeg2source("d:\matrix\matrix-unresized.d2v")
BicubicResize(480,360)
AddBorders(0,60,0,60)
Please note that for PAL the script would be
LoadPlugin("C:\temp\MPEG2DEC\MPEG2DEC.DLL")
mpeg2source("d:\matrix\matrix-unresized.d2v")
BicubicResize(480,432)
AddBorders(0,72,0,72)
Audio:
If you have done audio in DVD2AVI you might want to add this to your Aviynth script. In order to do this you make use of the WavFile function which takes the path and name of the WAV file as argument. And now we get a little more into programming. I don't know if this is completely accurate but it appears to me as if mpeg2source would return the mpeg2 stream and all the following operations would be applied to this returned stream. If you'd add wavsource("d:\matrix\audio.wav") after mpeg2source you'd end up with some errors, as now Avisynth would try to apply the cropping to you wave source, which of course won't work. What you have to do instead is to define temporary variables for both video and audio. Here's an example:
video=mpeg2source("d:\matrix\matrix-unresized.d2v")
audio=wavsource("d:\matrix\audio.wav")
audiodub(video,audio)
where the last line adds video and audio stream to one stream and returns it. Now you can place your crop & resize lines.
LoadPlugin("C:\temp\MPEG2DEC\MPEG2DEC.DLL")
video=mpeg2source("d:\matrix\matrix-unresized.d2v")
audio=wavsource("d:\matrix\audio.wav")
audiodub(video,audio)
Crop(0,60,720,360)
BilinearResize(640,272)
Is the final result for a DivX Avisynth script.
You can now load your avs file into the encoding program of your choice. Note that to prevent confusion I won't link to all the possible guides where you could continue now but if you've made it so far I'm sure you'll manage to find the right place to continue.
A last word for the DivX crowd: In VirtualDub you have to set video to Fast Recompress to profit from the speed increase. This means that you can't use additional filters :/
This document was last updated on March 13, 2003