DVD Wise
You need the following software for this guide:
Ripping and encoding utilities (requirements stated in the SVCD guides)
DV Tool
Vobsplit
bbMPEG
StreamWeaver - part of DVDMotion Pro. The manufacturer no longer offers a free demo of that product. Homepage
DVD Wise - There is no free demo. Homepage
Nero - NOTE: Demo version, you can buy the full version online. Homepage
First a piece of advice: This is NO beginners guide. You'll have to be completely familiar with the miniDVD guide as well as the most common ripping methods like extracting audio, cutting videos, converting audio, taking screenshots (not directly DVD related but import nonetheless... I use Hypersnap DX for all my screenshots since it supports custom screenshots and can grab DVD and other video sources if you enable it).
Also.. considering the time it takes to actually copy the structure of a DVD to a similar miniDVD this guide won't help you to much more than to impress your friends and family. I would never even consider backing up my DVDs like that... the time and work involved is pretty impressive and I'd be better of working and getting the money to buy several DVDs in the same time.
Step 1: Getting the right sources
A miniDVD is only perfect if it contains animated menus much like the original DVD so let's go to work. Refresh your knowledge about MPEG2 encoding and all surrounding it... to grab the right sources you'll have to.
Then sit down to work: Start up the DVD in a software DVD player and play around in the menus. Decide what you want to implement and what not. You might thing this is strange that Doom9 is suddenly talking about such not directly ripping related stuff but animated menus require a fair amount of preparation, because you'll have to determine what sources to get and in which format. So write down which menus you are going to make, if you want animated menu transitions, menu background sounds, etc.
There's certain limits on what you can do in DVD Wise. Unlike Micro DVD Player you can't simply have a video and put buttons on it, or play only part of a menu video (in MDVDP you can encode the whole animated menu part and grab a few screenshot and duplicate the DVD menu structure rather easily). Rather.. to have buttons on a video you'll have to have the video plus a bitmap which will be overlayed.. so the overlay bitmap must have the right graphics/text at the right position to match the video. Also.. since you cannot play a part of a video you'll have to split the menu videos into different parts.
I suggest that you convert the whole menu (which is contained in the vts_XY_0.vob file where XY represents the title set of the main movie) and that you convert the audio to mp2 during the process since otherwise this facilitates cutting. If you insist on having the AC3 (it won't be multichannel in any case) then what you can do is encode only the audio, then multiplex the audio and video in TMPG's MPEG Tools - select MPEG-2 Program (VBR) as stream type, use TMPG's cutter to determine start and end position, then multiplex the file again using bbMPEG 1.24b13, which allows you to set start and end offsets. Simple enter the values you've found out in TMPG's cutter in here... This is not an elegant solution but a working one.
 One of the nice things that was recently implemented in bbMPEG is the start and stop size options. It should be obvious how to handle these: start seconds tells the multiplexer where to start, 0 means at the beginning of the file, 10 means 10 seconds after the beginning, and end seconds means at which time it will stop. To get to this dialog - don't tell you haven't found it already... I told you to brush up your ripping knowledge - start avi2mpg2, then press Start Encoding right away and then settings.
In the end you'll have a bunch of BMP files and some video files. You will have to demultiplex all the video files you have created. DVD Wise (and any other DVD authoring program) want valid VOB files and only StreamWeaver or these programs themselves are capable of creating these kind of files. bbMPEG can create VOB files that will play in a DVD Software player when used in file mode... but for use on a miniDVD it's useless since we're going to watch it in disc mode. After demuxing mux the files again in a DVD compatible multiplexer... you can do that directly in DVD Wise or you can use StreamWeaver.
You will also need the bitmap overlays.. you might want to check out the DVD Wise manual for that or you simply read on.. the 2nd step will explain this a bit more.
Step 2: Authoring
If you've used DVD Quick Builder the interface will look rather familiar so you shouldn't have much trouble getting along. There's one major difference and that is the lower part of the screen.
 In the beginning there's only the Title set thumbnail there. A short explanation on the different things: VTS represents a titleset. To create a second titleset simply drag the light green VTS symbol over the existing Title set and it will create another title set. Menu is a simple non-animated menu with or without background sound. Title is a movie file.. for instance you can create two titles, the main movie and a trailer, VMG menu is an advanced menu that can contain video & audio and bitmaps overlayed over the video to create buttons. Slide creates a slideshow and won't be treated in this guide. To create a VMG menu drag and drop the VMG MENU image to VMG, to create a VTS, menu, title or slide drag and drop the corresponding symbol to Title set. Double clicking on a symbol in your hierarchy will bring up its properties. When an item is properly configured it will have a small green square in the left upper corner as shown on the image.
I chose "The Matrix" as illustrating example. My first play item when you start the disc will be the first 23 seconds of the animated menu.. till all the options are on the screen. So create a new VMG menu, which will bring up the following configuration screen:
 Dummy menus are used to link from one VTS to another... since I only use one VTS I'll never use them - and also... I'm still not 100% sure how they're being used.
Selecting Brief Video will ask you for a video file... when you create videos with buttons you'll also have to select an Overlay bitmap.. more on that later.
Then select a connecting pointer: I chose VMG menu 2 which will contain the other 1:04 minutes of the main menu, starting at second 23. The still time will have no effect on an animated menu, in a static menu it will define how long it takes till the player will jump to the connecting pointer defined.
About the still time: 255 in case of a movie will repeat the video over and over.
The next step is creating that fancy animated menu with buttons. Remember how the main menu looks?
So you'll have to create a template which will have scene selections, special features, languages, and play movie at the exact same position as in the image above. Furthermore.. and to make things even more complicated the template may only contain black fonts.. no other colors. I have only bothered to duplicate one of the 4 options.. and creating this was already pretty annoying for someone like me who's not so skilled in graphics editing. In any case I managed to make the special features look pretty much the same as in the original menu.. Create another VMG menu, load the video as before but select an overlay bitmap this time. The following dialog will appear:
 In the Background Color section select white and Lo contrast... we don't want the background to change color... just the writing in the template. You can define how the characters (or whatever you've created in the overlaid image) will look when selected by choosing a Pattern Color.
When you're done the main screen will show the image you've just overlaid.. so you can define your buttons.
Create a button as usual, then double click on it:
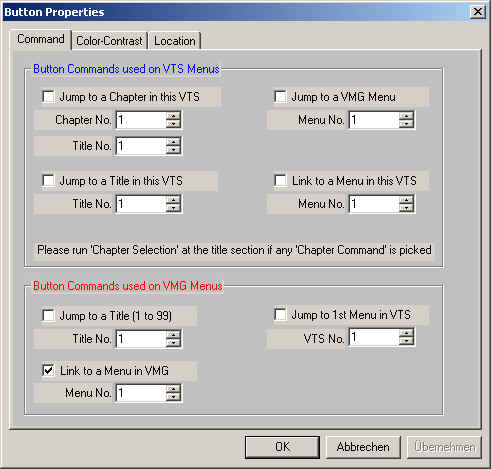 Since this is a VMG menu you only have 3 choices.. which I consider quite annoying but we'll just have to live with it. You can either jump to title 1 (which contains my main movie), jump to the first menu in a VTS - I only have one - or to another VMG menu. I chose jump to 1st Menu in VTS which is my chapter selection...
Then I created the main movie as in the main miniDVD guide. However the option screen looks slightly different compared to DVD Quick Builder:
I chose VMG menu 2 as connecting pointer which will result in reloading the animated menu once you've watched the movie.
Then create the normal menus as usual... but you can use templates again to make irregular shape buttons. For instance in the chapter selection we don't have squares..
 What I tried to achieve here was that I wouldn't have an ugly selection overlapping the 'screens' in the picture but rather the border of the 'screens' would change. You'd define the buttons as usual as well as the actions to point to the various chapter, but you'd load a template which contains black screen frames which are at the same positions as in the menu.
 You can make a menu jump to a VMG menu as well if you wish.. I have decided to let the player jump back to the main animated menu after a minute idle time. I also defined an audio background file which I grabbed from the menu. Load the template in the Pattern Bitmap tab.
 Once again I didn't bother to create everything.. but the goal was just to make one selection work.
Using these methods you can go on and on till you have an exact duplicate of the DVDs menu structure. Certain things appear not to be possible.. for instance link from an animated menu to a chapter in a title. This might only be possible with yet a more sophisticated program.. which probably sells for $10'000 upwards. DVDit is also not capable to create that kind of menus. I'm afraid that it's virtually impossible to create a fully professional DVD with affordable software.
Step 3: Simulating the DVD
As in the DVD Quick Builder guide you can create the DVD files to simulate from your harddisk.
 Once again the difference to DVD Quick builder is slim. But since we want an animated menu to play on the disc's insertion we select First Menu/Video in VMG which will launch the first VMG menu.
Then create the image and burn the files as usual.