Then drag and drop a video file (.m2v) from the media stock room onto the button:
DVDMotion Pro guide
Unfortunately the manufacturer of DVDMotion Pro does no longer offer a free demo version.
Another trial in achieving the ultimate goal: a perfect duplicate of "The Matrix". I must say that this one already got quite close: animated menus, in-between-menu-movies, multiple audio tracks, but it was not quite perfect. The same tool does also allow for VCD and SVCD authoring but be advised: any questions regarding DVDMotion and (S)VCD will be forwarded directly to the trash can. If you want to try it out go ahead, but don't count on my support for that one. The program is quite an overkill for that kind of authoring.
You should also have read the basic miniDVD guide which covers the most important basics of miniDVD.
Step 1: Preparing the sources
As usual you should spend a lot of time planning your miniDVD. It's best if you first play around in the DVD's menus a bit to get a feeling of what's "on the disc". Then decide what you want to make on your own. Be advised that the more complex the disc is, the more work will be involved. Then convert the movie according to the SVCD guide, while forgetting about bitrate limits or other format restrictions. Be advised that the standard SVCD resolution of 480x480/576 can't be used for miniDVD. Also set your stream format to general MPEG2 or ~DVD in bbMPEG. Be sure also to convert the menu to whatever format you may want, and of course the audio. Then you have to cut the menu videos into pieces that you can use for menu transitions and similar stuff. Also make screenshots for non-animated menus. Make sure that these screenshots match the resolution of your video sources.
This is a really crucial step. During my tests I usually didn't knew exactly what could be done and I progressed rather slowly because I had to encode other material whenever I wanted to create something new. So make sure you have a very well defined plan of what you want to do before you proceed. Unfortunately even the bbMPEG mux is unable to cut ac3 files into pieces.. it works in PowerDVD but StreamWeaver refuses to play them. The only way to have ac3 sound in small transition videos is therefore to convert the AC3 to WAV and then convert the WAV back to AC3 in Soft Encode.
To multiplex the main movie and define chapters please refer to the main miniDVD guide.
Step 2: Authoring
Another program, another concept of how to use it. Although DVDMotion supports basic drag and drop its capabilities are really limited in that way.
DVDMotion has the main window where your elements will be displayed, a media stock room where you can drag & drop files in from your desktop or explorer, then a slide palette on the left of the main window and a status window in the lower right corner. A slide represents an element of your DVD: a VOB file, a Menu, a Still (BMP file), or a Video. Then you can link this slides in any way you want. The first play item is the first slide.. it will be played upon insertion of the disk in the player.. or rather upon startup of your software DVD player.
![]() Here are the most important buttons in DVDMotion. The uppermost is pretty useless.. it would launch a random slide from your DVD. The 2nd button can be used to load a VOB file, the third creates a menu - any kind, static or animated background, with or without background sound - the fourth creates a still and the fifth creates a video. To assign a type to a slide, click on the respective slide and then on the button. For instance to have an animated intro click on the first slide, then press on the dvd or AV button. Chose the dvd button if you've already multiplexed video and audio, otherwise click on AV.
Here are the most important buttons in DVDMotion. The uppermost is pretty useless.. it would launch a random slide from your DVD. The 2nd button can be used to load a VOB file, the third creates a menu - any kind, static or animated background, with or without background sound - the fourth creates a still and the fifth creates a video. To assign a type to a slide, click on the respective slide and then on the button. For instance to have an animated intro click on the first slide, then press on the dvd or AV button. Chose the dvd button if you've already multiplexed video and audio, otherwise click on AV.
Then drag and drop a video file (.m2v) from the media stock room onto the button:
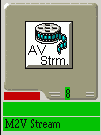 This is a slide element.. you can see it's slide 8, that it will contain an M2V stream and that it has currently no assigned element (hence the red bar) and no name. Then, after dragging and dropping a video stream on it there will be a thumbnail of one of the video's first frames instead of the boring button. Then right click on Edit Selected Slide Attributes:
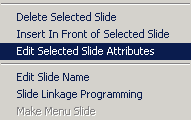 As you can see it's also possible to delete the slide, insert a slide before the currently selected one (the currently selected one is the one being displayed in the main window.. it does not matter over which slide you right-click). You can also change the Slide name and the Linkage programming but we'll get to that later.
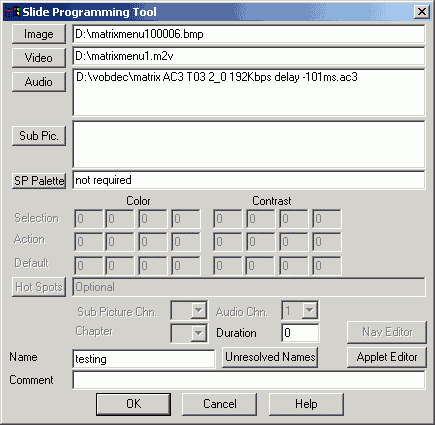 Here you can assign another thumbnail for the slide if you like, change the video stream, add one or more audio streams, define subtitles, etc. The palettes are disabled because it's a video. You can enter a name directly here, and pressing on Applet Editor will bring up the link programming options.
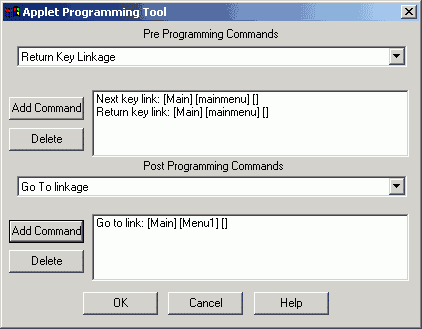 Here you can define actions for the buttons on your remote in the first part and Post Programming Commands in the second part. Select a key, press Add Command and the Linkage Address Selector will come up which allows you to chose to which Slide and which Index/Chapter it will jump.
As you can see after having played the movie the player will jump to the main menu as I defined a Go to link to Menu1.
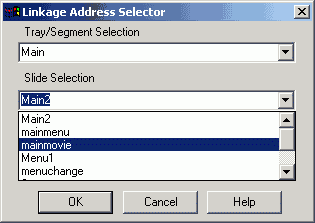 It's possible to have more than one Trays but usually it's not necessary. I'm defining a link to the main movie as an example. You can also select the chapter number if you link to a video that has chapters.
In the end when you've defined all your actions the slide will look quite a bit different:
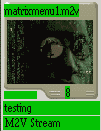 Everything is green.. or okay. The slide has its own name, you can see which movie is associated with the slide and that it's an m2v stream.
Now let's define an animated menu:
Click on an empty slide, then click on the Menu button and drag&drop a movie file from the Media Stock room on the menu button placeholder in the slide. Define the name and audio files as described above. Then you'll be asked to create a couple of hotspots.. which corresponds to menu buttons. There will be small, unfilled red squares in the upper left of the main movie, each one of them represents a hotspot. But let's first take a look at the slide attributes:
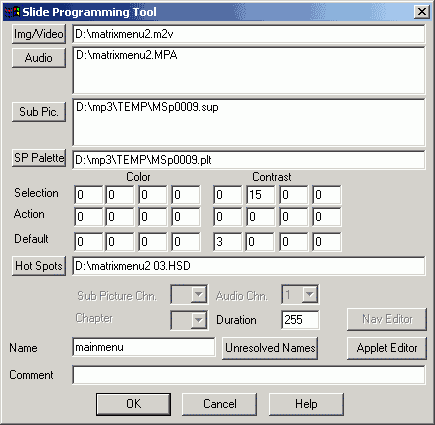 The Palette is now active and you can define your colors and Contrasts. Depending on what kind of buttons you want to create you can play around with these options. I strongly suggest you read the manual for more information.. these palettes are quite powerful if you know how to use them properly. You can also define a duration.. in case of a movie this is not relevant but in case of a static menu it well is. After the time has run out in case of a still menu the player will jump to the slide where the go-to linkage points to so make sure that you define such a link in the applet editor. Duration 255 means infinite by the way. You don't have to load a hot spot file, DVDMotion will create that file for you when you draw the hotspots.
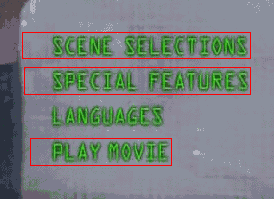 Enlarge your hotspots by right clicking on each of them (left clicking creates a new hotspot), and place them on the right place.
 This window will also open when you right click on a hotspot. You can define which remote key calls the menu options by defining a Key Number and define where the menu links to by pressing the Linkage Address button and select a link as shown above for the go to command.
Right clicking on the actual hotspot when you've the hotspot parameter window already on your screen will bring up even more options.
 Here you can define which kind of hotspot you'd like. A graphical hotspot allows for the most interesting effects, however you will have to consult the manual and do your own tests to figure out what can be done. There's lots of options.

Shown above are the Graphical Hotspot options. You can assign colors when the button is selected, etc. You can also define your own shape and decide whether or not the hotspot should be filled. For more information please refer to the manual once again. There's way too many options to write them down here and I only know a very small part of them in any case.
VOB sources are pretty easy to work with, just click on an empty slide, click on the dvd button, and drag and drop a vob file from the media stock room to the thumbnail. Then define the slides options and applet programming as usual.
DVD Stills are menus without any selections. They are usually used for credits screens, copyright notices and other things that require no interaction. Make sure you define a go to link or a button link, otherwise you'll be stuck in the menu and never come out again.
Now just create all the slides you want, define hotspots and link the files to each other. Make sure you define no dead ends.. always make sure that there's at least a button or an exit link defined. When you are happy with the result go to any slide's options and press the Unresolved Names button, and delete any unresolved links, otherwise the project won't compile. It's also important.. that in the case when you actually deleted a slide that you'll recheck all your links.. it could be that one points to the item that you've just deleted. DVDMotion is unable to check that before you compile and it's rather frustrating to wait 10 minutes just to find out that there was a glitch at some place.
![]() The first button will compile the title. Depending on the size of your project that will quite take a while. You'll be asked on which harddrive to create the files, make sure you have enough space. Interestingly now WinDVD plays these miniDVDs from my harddisk and I'm not sure whether it's due to the other muxer or the upgrade to WinDVD 2.3. PowerDVD will not play any DVDs from the harddisk so far. But you can use DVD Station to test the miniDVD.
The first button will compile the title. Depending on the size of your project that will quite take a while. You'll be asked on which harddrive to create the files, make sure you have enough space. Interestingly now WinDVD plays these miniDVDs from my harddisk and I'm not sure whether it's due to the other muxer or the upgrade to WinDVD 2.3. PowerDVD will not play any DVDs from the harddisk so far. But you can use DVD Station to test the miniDVD.
The 2nd button allows you to create an image which can later be burned. ForDVD has a bunch of options which can be accessed by the options menu:
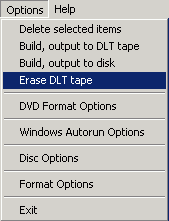 In the DVD Format options you can define how many side and layers you want (useless for miniDVDs) and set region codes. Windows Autorun Options will allow you to set an autorun application.. like these DVDs that have PCFriendly on them. In Disc options you can change the name and other disk related stuff.
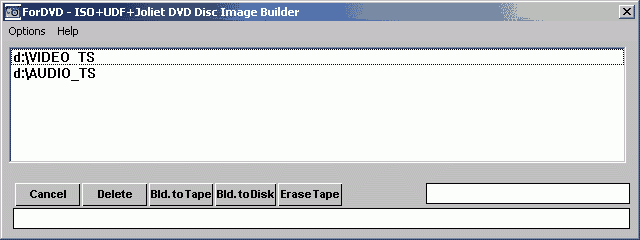
Make sure the right directories are selected, then press Bld. to Disk. You should then be able to burn the image file in Nero as described in the main miniDVD guide. Alternatively simply burn the VIDEO_TS and AUDIO_TS directory that the title compilation created for you according to the instructions in the main miniDVD guide.