DVD Rebuilder guide
If you're into backup up DVDs to DVD±R and haven't spend the last month on some island, you've probably heard of DVD Rebuilder, or DVD-RB. It is the first one click tool to use CCE for video encoding. As you might know, CCE is pretty much the undisputed king when it comes to re-encoding DVD in high quality - and it's fast as well - faster than most of not all of its competitors. And it is not limited to the expensive CCE SP: it also supports the budget CCE SP, and QuEnc, a free MPEG-2 encoder based on ffmpeg. In addition, ReJig, an open source compressed domain transcoder is also supported.
Currently, the program isn't as well featured as some of its competitor, so you can't select audio, subtitles and bitrate for each PGC, remove PGCs from the movie or even put multiple movies on a single DVD. It also can't handle multiangles and seamless branching titles yet, but the author has promised to deliver this once all major bugs have been ironed out. And I'm sure we'll see some more features after that as well.
You'll need the following software for this guide:
CCE SP / CCE
Basic / QuEnc / Rejig
AviSynth
Decomb
DVD
Rebuilder
DVD Decrypter
Step 1: Setup
First you have to install AviSynth if it's not already installed on your system. You should use at least AviSynth 2.50.
You will also need a copy of MPEG2Dec3dg.dll from the DVD2AVI v1.1.0 package. Copy MPEG2Dec3dg.dll into your AviSynth plugin folder (for a standard installation you'll find the folder in c:\program files\AviSynth 2.5\plugins\).
Then install whichever encoder you prefer. CCE offers the highest quality, and comes in second when speed is concerned (unless you're making a lot of passes). It is however also the most expensive. CCE basic still offers good quality, at a reasonable pricetag and is speedwise the same as CCE SP. QuEnc is the slowest of the bunch, but should offer better quality than Rejig, which is only a transcoder (but this makes it the fastest of the bunch). Note that using QuEnc can lead to undersized files as QuEnc is not very good at keeping the filesize. If you use CCE SP 2.50, or CCE SP 2.66/2.67 demo, you'll need EclCCE. Unpack EclCCE anywhere you like, then start it. All you get to see is a file open dialogue. Select your CCE SP demo executable and press OK. This will launch CCE SP, and this concludes the CCE SP installation.
If you plan to use the deinterlacing function, you also have to copy decomb.dll to the AviSynth plugin directory.
Step 2: Ripping the DVD
The best way to begin is create an ISO image of the DVD and mount this as a virtual drive. That way we'll always have every file we need available right on our harddisk and won't have to insert the original DVD again. It also saves us from embarrassment of accidentally deleting a file you'd still need as all the files in the image are read only.
As an alternative method, you can rip the dvd using DVD Decrypter in File Mode, press F, and press the big button. Check out the DVD Decrypter guide which describes this in great detail (and pictures).
Step 3: Set up DVD-RB
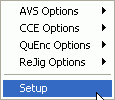
The first thing to do is configure DVD-RB. Press Options - Setup to access the setup menu.
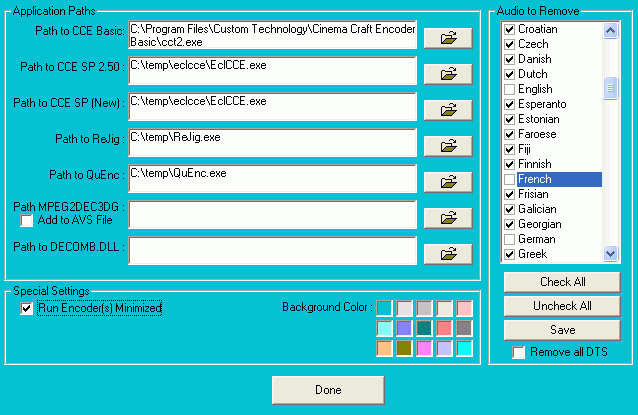 Under
Application Paths, enter the paths to the MPEG-2 encoders you have installed.
You don't have to fill in everything like I did, just add the encoder you actually
plan to use.
Under
Application Paths, enter the paths to the MPEG-2 encoders you have installed.
You don't have to fill in everything like I did, just add the encoder you actually
plan to use.
You can leave Path MPEG2DEC3DG empty if you've put this file in the AviSynth plugin directory. If you encounter errors with your AviSynth scripts, try adding the path anyway, and check Add to AVS File.
The Path to DECOMB.DLL is also not be required if you've added decomb.dll to your AviSynth plugin directory. However, if you're getting problems when using deinterlacing, try specifying the path.
Under Special Settings, check Run Encoder(s) Minimized, so that in case you plan to use your PC while DVD-RB is working, you wont' have to fight with a lot of programs blocking your screen.
And if you don't like the color of the program, you can change it using the Background Color palette.
Then we have Audio to Remove and Subtitles to Remove which should be pretty self-explanatory. By default, DVD-RB will keep all audio/sub tracks that are on the DVD. But, if you only want to include certain tracks (for instance I've chosen to only include English, French and German), click on Check All, then uncheck the languages you want to keep. Finally, press Save to save the selection (otherwise, DVD-RB will discard it once you've exited the program).
Checking Remove all DTS would remove any DTS audio streams found on a DVD.
Then press Done to get back to the main screen.
Now let's have a look at the other menus, starting with Mode:
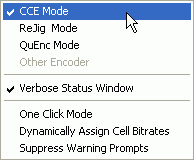 Here
you select which encoder is going to be used: CCE, ReJig or QuEnc.
Here
you select which encoder is going to be used: CCE, ReJig or QuEnc.
If Verbose Status Window is checked, the status panel will contain extra information. Echo Status to Log File doesn't do anything yet, but when it's done the status panel will be saved to a log file.
One Click Mode enables you to perform the entire rebuild process with the click of one button: the transcode button (you'll see it in just a second). DVD-RB can also shutdown the computer after a rebuild completes if the Shutdown at One-Click Completion option is enabled. You will be given a 10 second window to abort the shutdown.
Dynamically Assign Cell Bitrates makes DVD-RB analyze the bitrate of each cell of the original DVD, and use a proportional bitrate for the encoded cells. If not enabled, each cell will have the same bitrate.
Steal Space from Extras reduces the bitrates of all VTS sets except the largest one. It then takes the space recovered and allocates it to the largest VTS set. This option is intended to increase the quality of the main movie, at the expense of the extras.
Half-D1 and Half Space for Extras encodes all VTS sets except the largest one at half normal DVD resolution and at 50% their normal bitrate. The space saved will be allocated to the largest VTS set. Half-D1 is part of the DVD standard, but some DVD players may not fully support it.
Suppress Warning Prompts is useful in One Click Mode. It prevents DVD-RB from displaying any warning prompts that could require your attention (and stop a project in progress). Obviously, this is somewhat dangerous so it's probably a good idea to do a few projects without this, to get to know what warning messages you might get.
Then let's have another look at the Options menu:
As you can see,
this also enables us to access the properties for our MPEG-2 encoders, and the
options for AviSynth.
First, the AVS Options:
 ConvertToYUY2()
converts the video to YUY2 colorspace before encoding. This should be enabled
if you're using CCE (for more infos, check the CCE
FAQ, Q14.4)
ConvertToYUY2()
converts the video to YUY2 colorspace before encoding. This should be enabled
if you're using CCE (for more infos, check the CCE
FAQ, Q14.4)
AudioDub(BlankClip()) is a workaround for a bug in certain CCE versions. Enable this if you're using CCE 2.5 and have an AMD CPU.
There's another level in that menu, accessible if you click on Advanced (Expert)
Options:
 The
Filter Editor allows you to customize your AviSynth scripts by inserting commands. You
shouldn't mess with this option unless you know how to write .avs scripts.
The
Filter Editor allows you to customize your AviSynth scripts by inserting commands. You
shouldn't mess with this option unless you know how to write .avs scripts.
When dealing with interlaced content, you can enable Deinterlace with DECOMB, which uses Decomb's fielddeinterlace to deinterlace the video. This slows down encoding.
Enabling MPEG2Source("Source",idct=7) changes the MPEG2Source function to use SimpleiDCT from the Xvid project. This decodes the original DVD video at higher (mathematical) accuracy than the default iDCT.
Disable "Interlaced" is intended as an override for incorrectly flagged progressive material that would erroneously be treated as interlaced. This situation is not common with NTSC, but is occasionally found with PAL video. Progressive material, that is flagged correctly, will be treated properly automatically.
Resize to Half D1 triggers resizing of select VTS sets to half the standard resolution. While half D1 is part of the DVD specifications, not all players like it so be careful.
Convert from LB 4:3 to 16:9 allows you to turn letterboxed 4:3 sources to a 16:9 anamorphic widescreen picture. Like Half-D1, it can be set on a per VTS basis.
Back in the Options menu, we have the CCE Options:
 The
first thing to do here (in case you're using CCE) is select the proper CCE version.
CCE SP 2.67 users should check CCE SP 2.66+
The
first thing to do here (in case you're using CCE) is select the proper CCE version.
CCE SP 2.67 users should check CCE SP 2.66+
If you are using a version of CCE other than Basic you can try One Pass VBR (w/Analysis). This requires half, or less, of the time for a normal CCE encode, but output size is not guaranteed (it may be over DVD-5 size, which means it cannot be burned) and quality will be less than the standard Multi-Pass method.
Advanced (Expert) Settings allow you to configure certain CCE parameters:
 VBR_Bias
controls how CCE distributes the bitrate. During the first CCE pass, the bitrate
is distributed to achieve constant quality. The bias determines how much weight
is given towards keeping that allocation. High values prevent high bitrate fluctuations
in between GOPs, and low values give CCE more freedom to use bits in highly
demanding areas.
VBR_Bias
controls how CCE distributes the bitrate. During the first CCE pass, the bitrate
is distributed to achieve constant quality. The bias determines how much weight
is given towards keeping that allocation. High values prevent high bitrate fluctuations
in between GOPs, and low values give CCE more freedom to use bits in highly
demanding areas.
VBR_passes indicates the number of CCE passes. This has to be 2 for CCE Basic. For all other CCE versions, note that if you use X passes when setting up CCE manually, enter X+1 here as CCE SP does not count the creation of the vaf file as one pass.
Quality_prec corresponds to Image Quality Priority in CCE 2.50, and Quantizer characteristics in CCE 2.66/2.67. The value ranges from 0 - 64 (as in CCE 2.66+), but is scaled to 0-100 when using CCE 2.50 (so if you're a CCE 2.50 user and have set this parameter to X, you have to enter X*64/100 in DVD-RB). This setting determines if CCE gives priority to image details, or evenly colored areas. The lower the value, the more priority will be given to details, which could result in blockyness or banding in other areas. A high value will result in good looking evenly colored areas, but could result in edge artifacts.
Press Done to get back.
When using QuEnc, you might want configure the QuEnc Options in the Options menu:

Trellis Quantization can help improve quality, at the expense of speed. KVCD "Notch" Matrix is a custom quantizer matrix, and as with most custom matrices, the use is debatable. Single-Pass Encode will encode the video in half the time of a normal 2-pass encode, but at significantly reduced quality.
There is currently nothing to be configured in the Rejig menu so you can skip that, which means we're done with the setup.
Step 4: Encoding
Now it's time to select our source. Press the folder button, and select your VIDEO_TS folder on your virtual Drive, or the folder DVD Decrypter ripped your files too. DVD-RB will list all VTS sets contained on the DVD, and the audio streams that you did not select for exclusion:
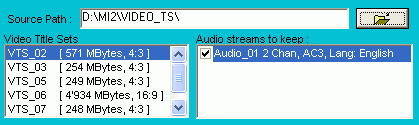
The next thing to do is select a working path. You need at least twice the size of a DVD±R in your working path (in case of ReJig it's 4 times the size of a DVD±R)
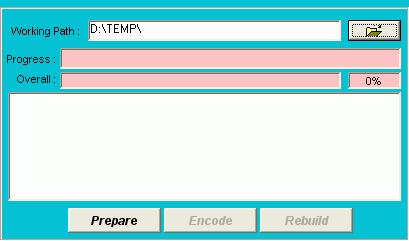
Now you can press Prepare to start the preparation step. Or, in case you have activated One Pass Mode, there's just one button: Transcode. Press it and when DVD-RB is done, all that remains to be done is burn the DVD. The preparation step involves the following:
There's yet another option: Batch Processing allows you to encode multiple movies after each other, without any manual interaction. To activate Batch Processing, press Files - Batch Processing.

This enlarges the main window:
 To
be able to add a project to the batch processing list, you have to set up everything,
then instead of starting to encode, save the project (File - Save
Project). Repeat this for all all your movies, then press Add, and
select one project file after another until all have been added. Finally, press
Process to get the whole process started. All movies will then be encoded in
One Click Mode.
To
be able to add a project to the batch processing list, you have to set up everything,
then instead of starting to encode, save the project (File - Save
Project). Repeat this for all all your movies, then press Add, and
select one project file after another until all have been added. Finally, press
Process to get the whole process started. All movies will then be encoded in
One Click Mode.
While DVD-RB is working, you'll see two progress bars:
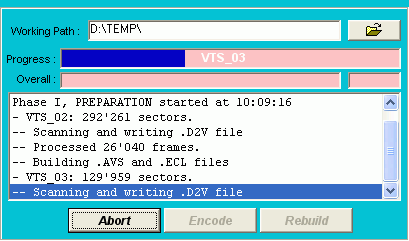 Progress
indicates the progress for the job DVD-RB is currently working on (for instance
create a DVD2AVI project file for a certain VTS set), and Overall for
the overall progress.
Progress
indicates the progress for the job DVD-RB is currently working on (for instance
create a DVD2AVI project file for a certain VTS set), and Overall for
the overall progress.
You'll also see a lot of messages as DVD-RB will write out a lot of information about what it is doing.
Once the first step has been concluded, the Encode button becomes active.
Press it to start the encoding phase.

This will take quite a while. Once done, the Rebuild button will become active. Press it to start the 3rd step.
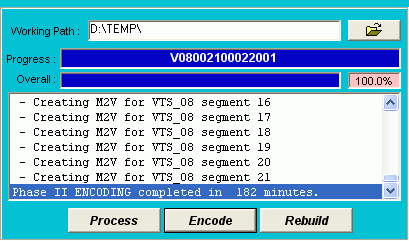
Once this step has completed, you'll find a VIDEO_TS and AUDIO_TS directory in your Working Path (in our example: D:\TEMP\VIDEO_TS and D:\TEMP\AUDIO_TS).
There are many programs to burn a DVD. Either use your favorite DVD burning tool, or use ImgTool / DVD Decrypter, a fully featured and free of charge solution.
This document was last updated on June 30, 2004