DVD Shrink - full movie
After pressing next you'll have to select a compression level:
 Depending
on the movie you can simple select a compression level and proceed to encoding.
In this case however, the movie is too large and even at compression level 8
it would still be too large to fit on a DVD±R. Furthermore, the higher
the compression factor, the lower the quality and 50% reduction does really
not yield a good quality anymore.
Depending
on the movie you can simple select a compression level and proceed to encoding.
In this case however, the movie is too large and even at compression level 8
it would still be too large to fit on a DVD±R. Furthermore, the higher
the compression factor, the lower the quality and 50% reduction does really
not yield a good quality anymore.
In order to fit the movie on a single DVD±R we therefore have to tune
compression levels and remove certain audio streams to further reduce the size.
To start the customization press Customize Streams.
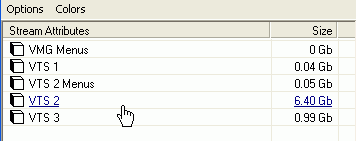 At
first we get to see an overview of how the GBs are allocated over the different
titlesets. VTS2 is the largest and contains our main movie. Menus make only
an insignificant contribution to the total size so I'm going to leave them untouched
(in customization mode by default every item will be compressed at level 0 =
no compression so unless you change that, all untouched items will not be compressed).
At
first we get to see an overview of how the GBs are allocated over the different
titlesets. VTS2 is the largest and contains our main movie. Menus make only
an insignificant contribution to the total size so I'm going to leave them untouched
(in customization mode by default every item will be compressed at level 0 =
no compression so unless you change that, all untouched items will not be compressed).
To expand the interesting streams press Options - Show streams of significant
size.
At first let's process VTS3 (we want to squeeze out the maximum of less popular
items like extras before we increase the compression level of the main movie).
 As
there's no per PGC compression control we have to settle for one compression
level for a complete VTS.
As
there's no per PGC compression control we have to settle for one compression
level for a complete VTS.
Press the small play button to the right of No compression to get a preview.

As expected, VTS3 contains the extras so you can safely choose a high compression
factor like level 6. As for the audio, the first 5 streams are indicated as
0 Gb which leads me to believe that they are in fact not even there. A look
at the IFO in IfoEdit confirms this, so there's no need to uncheck them as it
wouldn't gain you any space.
Then we have to configure the compression level for VTS2:
 First
of all get rid of all audio tracks you don't need, then increase the compression
level until the Total DVD size in the lower right is smaller than 4.38Gb. Using
the abovementioned setup for VTS3, compression Level 4 is required, but this
only fills 4.24 Gb. Changing menus and VTS1 won't help much because they are
too small.
First
of all get rid of all audio tracks you don't need, then increase the compression
level until the Total DVD size in the lower right is smaller than 4.38Gb. Using
the abovementioned setup for VTS3, compression Level 4 is required, but this
only fills 4.24 Gb. Changing menus and VTS1 won't help much because they are
too small.
The only alternative I found for this disc was increasing the compression level
for VTS2 to 3, and turn VTS3 into a Still Movie. This option returns the extras
in VTS3 into an I-frame only stream which corresponds more or less to a quick
slideshow (you have one real frame every 15 frames). But then I'd rather keep
the main movie only (this option would require compression level1 which is a
definitive improvement compared to level4).
In the end I settled for Level4 for VTS2 and Level3 for the extras as to best
fill up the DVD while keeping the 5.1 audio track for the main movie.
Once you have made your choice press OK.
 As
you can see, the encode level is now custom streams and the expected size 4.31
Gb so it will fit on a DVD±R.
As
you can see, the encode level is now custom streams and the expected size 4.31
Gb so it will fit on a DVD±R.
Press Next to proceed.
 In
this screen you'll select the output path by pressing the Browse button and selecting
a path on your harddisk.
In
this screen you'll select the output path by pressing the Browse button and selecting
a path on your harddisk.
Target DVD regions indicate which region code your player must have to be played
back, for regionfree operation select all 6 regions.
Provider ID indicates who created the DVD, if you like you can add your own
signature there. How about Doom9 DVD productions? ;)
Press Next to start encoding.
 If
you like, you can check Video Preview and you'll get to see what is currently
being encoded. This will of course eat up some CPU time so the program will
be quicker if you do not activate this option.
If
you like, you can check Video Preview and you'll get to see what is currently
being encoded. This will of course eat up some CPU time so the program will
be quicker if you do not activate this option.
Time remaining will give you an estimate when you have to come back from your
coffee break to burn the DVD.
Once encoding has completed DVD Shrink will shown a screen indicating what files
it has written. Press close and you are now ready for burning.

This guide was last updated on
April 12, 2003