
DVD Shrink 2 guide
Recently, compressed domain transcoders have reached quite some popularity. These transcoders are based on algorithms designed to recompress an MPEG-2 stream in real-time for TV broadcast. These programs can transcode an entire DVD movies in only a few minutes, because they do not have to decode and re-encode the entire video stream, but only part of it. I will not go into a detailed explanation of the mechanisms used as they are quite involved but basically what you get is a size (and hence quality) reduction per time unit that cannot be rivaled by regular MPEG-2 encoders (though the latter category can yield better quality). DVD2One was the first program to be based on these principles, now DVD Shrink is the first free program to offer this functionality. The 2.x branch of DVD Shrink contains many bugfixes and a completely rewritten transcoding engine which offers a higher compression factor but which is also somewhat slower. If speed is your utmost concern, both DVD Shrink 1.0x and the corresponding guide are still available.
You will need the following software for this guide:
DVD Shrink
ImgTool & DVD
Decrypter or a commercial DVD burning program
The first thing you'll have to do after starting up DVD Shrink is select a source. Press Open Disk to get a list of available DVD drives:
 A
list of all available DVD drives on your computer will be shown. Select the
one containing the movie.
A
list of all available DVD drives on your computer will be shown. Select the
one containing the movie.
Alternatively you could first rip the DVD to an ISO file using DVD Decrypter
and create a virtual DVD drive which you will use as source. This process is
explained here.
If you have already ripped the DVD in file mode (thus you have a collection
of .IFO, .BUP and .VOB files on your HD) press the Open Files button:
 Then
press browse and select the VIDEO_TS.IFO file you have ripped.
Then
press browse and select the VIDEO_TS.IFO file you have ripped.
Once you've selected the source disc, of IFO file, DVD Shrink will perform a
quick analyzation pass over all the video items. Just let it do its job, it
won't take very long.

Now before we proceed let's quickly check out the Preferences by selecting Edit - Preferences.
 Set
Target DVD Size to DVD-5 and the error margin according to how bold you
feel ;) Actually, the output size estimation of DVD Shrink isn't entirely accurate
and in order not to get oversized projects, DVD Shrink will warn you when your
project size crosses the target size minus the error margin.
Set
Target DVD Size to DVD-5 and the error margin according to how bold you
feel ;) Actually, the output size estimation of DVD Shrink isn't entirely accurate
and in order not to get oversized projects, DVD Shrink will warn you when your
project size crosses the target size minus the error margin.
If you want to place additional files on your DVD for some reason you can select Custom from the dropdown list, then enter a custom size.
By default, DVD Shrink will start playing whenever you click on a video item. You might like that, I personally don't so I deactivated Play video preview whenever selection changes.
Checking Show only audio/subpicture streams of 1MB or more will spare you some grief trying to figure out where all those audio / subtitle streams came from in the global overview of some DVD discs so make sure it's checked.
Press OK to get back to the main window.
Now it's time to get to know the different parts of DVD Shrink, starting with the size bar.
![]()
This bar indicates the size of your project. If it's all green right from the start you're dealing with a DVD-5 and can do a 1:1 copy by pressing the Backup! button

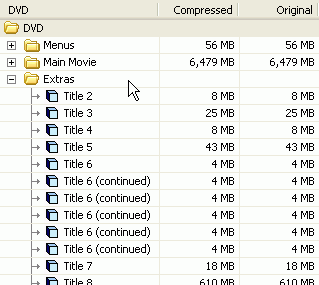
On the upper left side of the window, the general structure of the DVD will be shown. As you can see there are 3 top categories, Menus, Main Movie and Extras. The folders react just like in Windows Explorer so you can click on those having a + sign and they'll open, displaying their contents. For each item you have two values: the compressed size and the original size. Clearly, at the beginning those sizes will be the same.
To the right of the structure you have the individual streams contained in the item selected on the left side. Below you'll see how the main movie item looks like. It has a large video stream, 6 audio streams and two subtitle streams. For now, do not change anything on the right hand side, we'll get to that later.

Finally, on the lower left we have the preview window. If you didn't change this in the preferences, whenever you click on a folder in the structure overview, the selected item will start playing so you'll know what you're dealing with.

Now back to the size bar:
![]()
If the bar turns red at some point you're at a crossroad:
If you want to keep all the features of the DVD, the proper mode is already selected for you: Full disc.
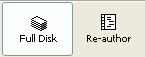
If you prefer to keep only parts of the disc and discarding parts (or all) of the extras, select Re-author instead (technically, when re-authoring you create a new disc from scratch and add whatever you like from the original disc to it). Re-author allows you to create your own DVD by putting only content that you really want on a DVD. It does not allow you to keep the menus though. If you want to entirely remove certain items but keep the menus you have to use program like IfoEdit or commercial transcoders like InstantCopy and DVD95Copy. You can also combine IfoEdit with DVD Shrink, remove stuff you don't want in IfoEdit, then compress the remaining movies using the Re-encode function of DVD Shrink but that's beyond the scope of this guide since DVD Shrink is a program mainly designed for beginners.
So now that you know what you can do, what will it be? Keep everything on the DVD, remove some items or keep the main movie only?
Removing certain movie items requires basically the same procedure as keeping the main movie only. All you have to do is follow the main movie only guide, then just add more movie items after the main movie and configure them the same way you configure the main movie.
This document was last updated on June 4, 2003