Recode 2 Guide
I'm pretty sure you've heard the name Nero before. It was probably that piece of software that came with your CD / DVD burner, was it not? Ahead, maker of the Nero Burning ROM software has been aggressively moving into the DVD backup market earlier this year with the release of Nero 6. It came with probably the best AAC audio codec out there and a package called NeroVision that allows you to create and edit video and put it on (S)VCD or DVD discs. It also came with an application called Recode, which could be used to transcode DVDs to make them fit on a standard DVD±R/W disc.
But at the same time, Ahead was working to enter the "back up your DVDs to a single CD" market, which was started 4 years ago with the DivX ;) codec. Instead of developing yet another MPEG-4 codec, Ahead chose to go a different route. Their NeroDigital solution is an entire package for video, audio and subtitles, based entirely on the MPEG-4 standard. It includes an MPEG-4 Advanced Simple Profile video codec, a High Efficiency AAC audio encoder, using the standard MP4 container to contain both audio and video (and subtitles, but in a nonstandard form). The container also supports chapters which are taken from the original DVD. And instead of offering the tools separately, NeroDigital has been included in the upcoming major release of Recode - Recode 2. Recode 2 begins where Recode 1 left of. Users of the previous version, and users of its cousin DVD Shrink - will immediately feel at home since the GUI is so familiar. And as Recode 1, Recode 2 can also be used to transcode DVDs to a DVD±R disc and in addition to put multiple DVDs on a single DVD±R disc. And then of course there's the NeroDigital mode which converts a DVD to an MP4 file using NeroDigital.
You'll need the following software for this guide:
DVD Decrypter
& Daemon
Tools or an on-the-fly decryption driver like AnyDVD
or DVD Region-Free
Nero Recode 2
ImgTool & DVD
Decrypter or a commercial DVD burning program (if you prefer not to burn
using Nero Recode)
Step 0: First time setup
You'll only have to perform this step once. First time setup involves setting many parameters which then help to make subsequent DVD backup projects a lot easier.
To get started, you'll first have to select Recode's operating mode. As this guide is about Nero Digital, you should select Copy DVD to Nero Digital.
Press the More button to show Recode's options.
![]()
The first thing to look at are the profiles. You can define a number of profiles to select from. Profiles contain information like which movie items should be prioritized in terms of quality, and what audio and subtitle tracks will be included by default. Press Profiles.. to configure and create profiles.

 Press
the New button to create a new profile, or just go on editing the existing default
profile.
Press
the New button to create a new profile, or just go on editing the existing default
profile.
Set Quality distribution to the option you prefer. By default, Assign best quality to the Main Movie is selected, meaning that if you include extras or menus in the output (menus are not possible for Nero Digital output), the main movie will get more bitrate than the rest, and thus end up looking better. Of course, if the main movie is just distracting you from those wonderful extras, you could select Assign best quality to Extras ;)
Also only applicable for DVD output is the Keep all menus in original quality option, which does just what the name says: keeps the menu on their original form (and quality).
Then let's go to the audio tab:
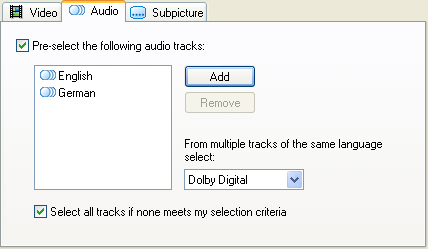 Here
you can select audio tracks that will be preselected for your output. Press
the Add button to add more languages, and select a language and press the Remove
button to remove a language again.
Here
you can select audio tracks that will be preselected for your output. Press
the Add button to add more languages, and select a language and press the Remove
button to remove a language again.
You can also select what type of audio is preferred by selecting the appropriate audio type from the dropdown box. By default, Dolby Digital tracks are preferred, but Recode allows you to select any other type of audio there might be. But on most DVDs, you'll have a Dolby Digital track. For DVD output, you could select DTS to preserve the high quality DTS track (but since it has a higher bitrate it takes always space that could otherwise be used for video).
Last but not least Select all tracks if none meets my selection criteria will lead to preselection of all available audio tracks, if none of the languages you've specified are actually present.
Then you can make the same language preselection for the subtitle streams and press OK to save your settings.
Then press the Configure button.
 The
first thing to configure are the DVD input options.
The
first thing to configure are the DVD input options.
The Prompt to include DVD data files when importing only applies to DVD output and can be used to include DVD-ROM files that might be present on the DVD in your final project.
Remove P-UOPs removes any user prohibitions that might be on the disc (such as ads you cannot skip, the impossibility to switch the language while watching the movie, etc.).
Remove Layer Break will remove the layer break that might be on a dual layer DVD.
Both Output DVD options only apply to DVD output.
Then proceed to Nero Digital.
 This
option obviously only applies to Nero Digital output.
This
option obviously only applies to Nero Digital output.
You can decide if Recode should ask you to perform a 2nd video encoding pass if the quality of the first pass isn't as impressive. Quite a good choice imho, but then again, Nero Digital is as fast that you're probably going to encode everything in 2 pass mode anyway.
The UI Options are not so interesting so let's proceed directly to the Preview Window tab.
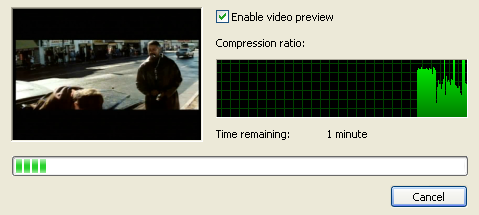
 Recode
allows you to preview every video item with audio.
Recode
allows you to preview every video item with audio.
Set the Audio preview option to whatever best fits your current audio setup. Always downmix to 2-channel stereo will work everywhere, whereas Multichannel requires an analogue 5.1 audio output (and of course that output has to be connected to some speakers somewhere down the line ;) and SPDIF requires a digital connection between your PC and your receiver.
Now press OK to get back to the main Recode window.
Step 1: Ripping the DVD
As Recode does not support encrypted DVD content, you have to rip the DVD to your harddisk first. If you have AnyDVD or DVD Region-free installed, you do not have to perform this step as they allow Recode to rip and encode on the fly.
Step 2: Backup up the DVD
In the startup screen you have 3 options to choose from:
 Copy
Entire DVD to DVD and Remake a DVD will produce DVDs, whereas Copy
DVD to Nero Digital creates MP4 output. If you want to keep the entire movie
or remove certain items (trailers, FBI warnings, etc.) but retaining more than
just the main movie, you have to select Copy Entire DVD to DVD. If you want
to put more than one DVD on a single DVD±R or join a flipper or 2 DVD
disc movie to a single DVD disc, select Remake
a DVD.
Copy
Entire DVD to DVD and Remake a DVD will produce DVDs, whereas Copy
DVD to Nero Digital creates MP4 output. If you want to keep the entire movie
or remove certain items (trailers, FBI warnings, etc.) but retaining more than
just the main movie, you have to select Copy Entire DVD to DVD. If you want
to put more than one DVD on a single DVD±R or join a flipper or 2 DVD
disc movie to a single DVD disc, select Remake
a DVD.
Recode can add both Video and data files into a disc. By default you start out in the video mode and the DVD-Video Files button is pressed.
![]()
By clicking on the DVD Data files button, you can add data files (for instance a software DVD player so that you can watch the DVD on any DVD equipped computer even if it does not have a software DVD player installed). Just press the Add Files button and select the files you want to have added. You can then organize your data files just like you would in Windows Explorer.
To select the video source, press the DVD-Video Files button again, then press Import DVD.
![]()
A regular Windows folder browsing window will pop up. Now you have to select your VIDEO_TS folder, either directly on the DVD disc (if AnyDVD or DVD Regionfree are installed), or from your harddisk and the folder you ripped the DVD to in step one. Recode will then perform a quick analysis of the source, which should take no more than a couple of minutes.
Once the analysis is done, Recode will show the contents of the DVD in the main window.
 As
you can see, Recode divides the video items (called Titles) into three folders
in function of where they belong. All that has to do with menus goes to the
Menus folder, the Main Movie is in the Main Movie folder and everything else
goes to the Extras folder.
As
you can see, Recode divides the video items (called Titles) into three folders
in function of where they belong. All that has to do with menus goes to the
Menus folder, the Main Movie is in the Main Movie folder and everything else
goes to the Extras folder.
You can also see the duration of each title, the target size and the compression factor of each item (given both as position on a slider and percentage value). As you move the slider to the left you note that the percentage value means down, which means you'll decrease image quality (100% means the picture will not be recompressed and be the same as on the original DVD).
Recode will try to scale each title in order to make the output fit on a single DVD±R disc. If you uncheck Fit to target, moving a slider will no longer trigger Recode's size correction mechanism and you can now run the risk of getting undersized or oversized backups.

In order to prevent this from happening, Recode has a size bar which indicates the current size of the project. As long as the red dotted line is not crossed, your output will fit on the selected target size (which you can of course also change using the dropdown menu shown in the previous screenshot).
![]()
But before you start playing with the sliders, let's first check out our audio and subtitle streams, which are shown to the right of the preview window.
 As
per your selection in step 0, only your preferred audio tracks will be selected
by default. Track 4 would be the director's commentary, and Track 5 is not used
in the main movie, but has to be present for authoring related issues (which
you don't have to know about).
As
per your selection in step 0, only your preferred audio tracks will be selected
by default. Track 4 would be the director's commentary, and Track 5 is not used
in the main movie, but has to be present for authoring related issues (which
you don't have to know about).
If you click on the Subpicture tab, you'll see the same thing for subtitles.
Now you can still reconfigure the selected audio and subtitle tracks, on various levels. Recall that Recode shows the DVD in a structure with a disc at the root, then 3 subfolders (menus, main movie and extras), and each subfolder contains a number of titles. If you click on the DVD icon, you can configure audio and subtitle tracks globally, if you select one of the 3 main subfolders, you can configure audio and subtitles on that level (that's great to get rid of secondary audio tracks in all extras at once), or you can configure those options on a title level (which obviously can take quite a bit of time, so I suggest you only worry about the 3 subfolders below the main folder).
Now let's have a closer look at our extras:

As you can see, Recode will compress the main movie by 42.6 % (100 - 57.4), which is quite a lot. In order to improve the quality of the main feature, you could increase the compression ratio of individual extras, or close the Extras folder, make sure it is selected and just move the slider for the extras folder. As with the audio and subtitle streams, this would change the compression ratio for all extras at once.
If you're using Recode's automatic size adjustment but still want to reconfigure the compression ratio of certain titles, the Lock Ratio button comes in handy.
![]()
Select the title, whose compression ratio you'd like not to be changed anymore, and press Lock Ratio. Note that in the Content overview, a small lock will now be shown to the left of the slider, and you can no longer move the slider.
If you want to change the compression ratio for titles separately, the preview window will come in very handy. Just select the title you're interested in and start playing.

And if you should decide that you can live without a certain title, select it and press the Disable button.
![]()
The following window will then pop up.
 In
order to preserve the structure of the DVD and guarantee that it can be played
on every DVD player, Recode will not remove titles entirely, but it can replace
them with a dummy picture which uses almost no space at all.
In
order to preserve the structure of the DVD and guarantee that it can be played
on every DVD player, Recode will not remove titles entirely, but it can replace
them with a dummy picture which uses almost no space at all.
Now you have 3 replacement modes: Slide show will turn the video into a slideshow, with only two images from the movie being shown per second. This obviously can still take up quite a bit of space if the title to be disabled is large.
Custom Picture can be used to just display a still image informing you that the title has been removed, and it takes up almost no space. There's a default picture available, but you can use anything you like, just press the Browse button and select an image of your liking.
Last but not least you can also choose a Custom Color which will result in a uniformly colored screen when trying to play the title.
Disabled titles will show up with a gray background and the compression ratio will say Disabled:

Now you're ready for encoding.
This document was last updated on December 10, 2003