Multiple audio tracks in a SVCD and subtitles
The following software is required for this guide:
SubRip
I-Author - Unfortunately the manufacturer no longer offers a free demo. Furthermore this software is only being distributed in China from this point on.
bbMPEG
Once again a word of advice: My guides are based on each other. This is what I consider an advanced SVCD guide and if you create your SVCDs by another method than the ones suggested in my SVCD guides you might not know everything will be mentioned here. If so please read my SVCD guide before e-mailing me any questions.
If you only want multiple audio tracks you can go directly to step2.
Step 1: Extracting the subsRemember the good old SubRip program? Well... it's back in action. For a complete understanding on how to use SubRip I suggest you read the Subtitle guide. Then let's get started..
 Almost
the same picture as in the Subtitle guide but not quite. Start SubRip, select
File - Open VOB(s) which will lead you to this window. Press IFO, select the
main movie IFO file and the appropriate subtitle track form the dropdown list,
then check all the main movie VOBs.
Almost
the same picture as in the Subtitle guide but not quite. Start SubRip, select
File - Open VOB(s) which will lead you to this window. Press IFO, select the
main movie IFO file and the appropriate subtitle track form the dropdown list,
then check all the main movie VOBs.
Then set Action to Save SubPictures As BMP and makre sure TC & Res is checked.
Also ensure that the Last TimeCode is set to 0:0:0.0, then press Start.
Subrip will then ask you for a filename. Actually, the prefix of a filename.
If you select sub in that dialoge you'll get subtitle files names like this:
sub00001.bmp, sub00002.bmp, etc.
Once the first subtitle has been encountered
you'll get to the following screen:
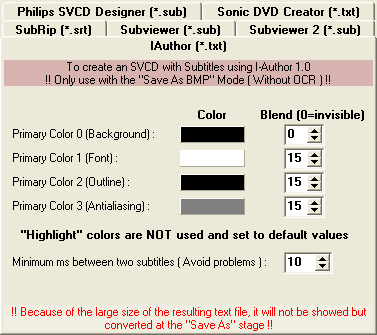
 Set
the preset to I-Author, then click on the cropping tab.
Set
the preset to I-Author, then click on the cropping tab.
 These
settings should work just fine for SVCD subtitles.
These
settings should work just fine for SVCD subtitles.
In case you're creating DVD subtitles (the CCE guide links to this guide as
well;) set the minimum picture width and minimum picture height to correspond
to the dimension of your DVD, that is 720x480 for NTSC DVDs and 720x576 for
PAL DVDs.
In both cases it's impreative that you set the vertical alignment to bottom
or you'll have the subs in the middle of the screen.
Then go to the positioning tab and make sure it looks like this:
 Once
you're done, select Output format - Set Ouput format in the window that will
show you all these strange lines with a lot of numbers that pops up once the
extraction starts.
Once
you're done, select Output format - Set Ouput format in the window that will
show you all these strange lines with a lot of numbers that pops up once the
extraction starts.

Then choose the I-author output format, which will save us a lot of conversion trouble.
 Select
the IAuthor tab and then press Convert to this format.
Select
the IAuthor tab and then press Convert to this format.
Once all subtitles have been extracted, select File - Save As to save the file
containing all the coordinates and timecodes. And now it's time to press the
back button in your browser should you have come here following the Scenarist
guide.
Step 2: Multiplexing
At the moment only I-Author is able to mux a file that contains subs. Of course you can use FlaskMpeg and enable subs there but this way you can actually turn them on/off during playback. I hope you already have your video and audio files ready. Start up the I-Author multiplexer:
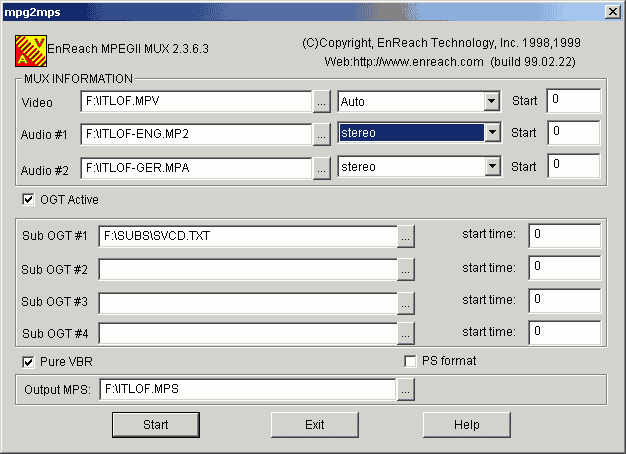
As you can see it's quite easy. Load the video file, the two audio files (or just one... whatever you want) then check OGT Active and load the textfile that Subrip has generated in step 1. Then chose an output filename and start muxing. If you've set 0 as timecode in SubRip (you usually should) then you should set the start time to 0.5 rather than to 0 if you use subs (modify the start time field right to the svcd.txt file).
I suggest you burn on CD-RW since you may have to adjust the start time several times till it works. Different languages may need different starting points. I know this is frustrating but this is all I can offer I'm afraid. If you think it's too much work maybe you can live with subs in the video stream... or getting the real DVD. Despite what I-Author tells you you can use negative starting times.
IMPORTANT: These subs apparently only work on standalone players!
After the process is completed go to burning.
You can of course also use bbMPEG to mux multiple audio tracks but for subs you have to use I-Author. The multiple audio track multiplexing was introduced in one of the v1.24 betas so I suggest you get the latest (unfortunately the par files will not work anymore and you'll have to recreate them). Start avi2mpg2, press Start Encoding, then Settings in the next window - you may remember that.. it's the same as when you use the bbMPEG plugin in FlaskMpeg.
 It's as simple as that... chose your video and audio files by pressing on Open VS, Open AS 1 and Open AS 2. Of course you can only use the alternative audio track when using a player that can handle the SVCD format. PowerDVD will only play the first audio track for instance because it's not SVCD compatible. You can mux almost everything in bbMPEG now... as for instance an MPEG2 and AC3 files as shown in the picture. Of course these settings are pretty useless since I have yet to find a mastering software that will accept muxed files.. usually those tools want you to give them a separate video and audio track and their multiplexer will create additional info files that are used to create the DVD... yes you heard right: SVCD has mp2 sound, the settings on the left are for a full-fledged DVD but as I said it's useless unless I can find an authoring program that allows me to use the created file... it plays fine in my software players and on the H+ but only with the first audio track... it would require a fully mastered DVD with ifo files and all to get it all working.. and I'm still working on that.
SVCDs CANNOT contain AC3 tracks... the picture is jus there to show off!
Then go to Program Stream Settings and set to SVCD, press OK and Start the multiplexing. You can use the same settings as in the SVCD guide. Unfortunately the version in the package (on which the picture in the main guide is based on) is quite different from the one you have to use to actually get 2 audio tracks... but since the guide is based on software that's in the rippacks I can't just go ahead and change the other pictures, too.
Credits
The software used to create subs was created by Ubanov and so was the initial
guide. Shots also go out to Keith who has done most of the testing and helped
me make my not-working guide into one that works.
This document was last updated on 07/09/02