
Xmpeg setup for S/VCDs
Right click again, and select Project options from the menu this time.
If you have an NTSC anime movie set timebase to 29.97fps no matter what Xmpeg chose.That will save you a lot of grief. The same also applies if you're going to create an NTSC VCD. Then set the Frame size to 480x480 for an NTSC movie and 480x576 for a PAL movie. For VCD it's 352x240 (NTSC) and 352x288 (PAL) respectively.

Then go to the audio tab:
 Uncheck Same as input and select 44100Hz. If you're sure your player support 48KHz you can keep the audio at 48KHz though.
The next tab is post processing:
 Depending on your encoder yo have to select a different format. CCE supports YUV2, LSX and TMPG do not, so in those cases you have to select RGB (which is slower).
The bressenham filter is a good choice.
Then select Keep aspect ratio and set it to 4/3 (yes, this applies to 16:9 movies too) and set the pixel aspect ratio to 1:1. I know the tool-tips tell you something else but try using what appears to be logical (16:9 DAR and 4:3 PAR and you'll see that the aspect ratio is way off).
You don't have to do any cropping.
In the files tab you can select the default output filename and directory but since we're only going to create frameserver stubs which do not take much space (less than 1 MB) there's no real need to change that. Last but not least let's go to the General tab.
 If you're going to use multipass encoding make sure you checked 2nd Pass Enabled (for multipass Plugin).
Then press OK to get back to the main window.
Right click and select output plugin selection:

Select the Video Server from the list.
Then configure the plugin:

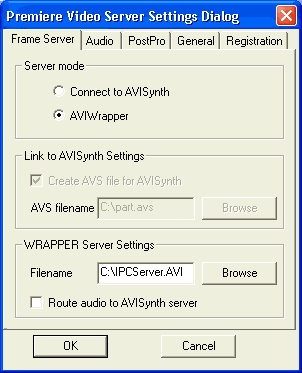 Basically
you can leave all the options, just make sure you have Route audio to AVISynth
server checked if you're using TMPG. If you're using CCE or LSX which have some
issues with AVS files uncheck that option and check Save to WAV in the audio
tab instead. That will give you a separate wav file which you can encode later
on (LSX and CCE aren't particularly good at encoding audio anyways and the proposed
solution for audio encoding in the respective guides is much better).
Basically
you can leave all the options, just make sure you have Route audio to AVISynth
server checked if you're using TMPG. If you're using CCE or LSX which have some
issues with AVS files uncheck that option and check Save to WAV in the audio
tab instead. That will give you a separate wav file which you can encode later
on (LSX and CCE aren't particularly good at encoding audio anyways and the proposed
solution for audio encoding in the respective guides is much better).
Once you're done press OK.
Then right click one more time and select Start conversion.
You'll get to the following screen showing you what's going on.
 Do not close XMPEG but go to the next step now.
>> BACK
This document was last updated on 08/31/02