NeroDigital Guide
I'm pretty sure you've heard the name Nero before. It was probably that piece of software that came with your CD / DVD burner, was it not? Ahead, maker of the Nero Burning ROM software has been aggressively moving into the DVD backup market earlier this year with the release of Nero 6. It came with probably the best AAC audio codec out there and a package called NeroVision that allows you to create and edit video and put it on (S)VCD or DVD discs. It also came with an application called Recode, which could be used to transcode DVDs to make them fit on a standard DVD±R/W disc.
But at the same time, Ahead was working to enter the "back up your DVDs to a single CD" market, which was started 4 years ago with the DivX ;) codec. Instead of developing yet another MPEG-4 codec, Ahead chose to go a different route. Their NeroDigital solution is an entire package for video, audio and subtitles, based entirely on the MPEG-4 standard. It includes an MPEG-4 Advanced Simple Profile video codec, a High Efficiency AAC audio encoder, using the standard MP4 container to contain both audio and video (and subtitles, but in a nonstandard form). The container also supports chapters which are taken from the original DVD. And instead of offering the tools separately, NeroDigital has been included in the upcoming major release of Recode - Recode 2. Recode 2 begins where Recode 1 left of. Users of the previous version, and users of its cousin DVD Shrink - will immediately feel at home since the GUI is so familiar. And as Recode 1, Recode 2 can also be used to transcode DVDs to a DVD±R disc and in addition to put multiple DVDs on a single DVD±R disc. And then of course there's the NeroDigital mode which converts a DVD to an MP4 file using NeroDigital.
While the solution is certainly powerful, there's one drawback that you should consider: MP4 files can currently only be played on PCs. While DivX and XviD capable standalone players are theoretically capable of playing MP4 files, no player manufacturer has paid an AAC decoding license, and no player supports the MP4 container (with built-in subtitles). And DivXNetworks, the company currently actively pushing DivX to standalones, have so far not decided to push for a certification to include AAC audio and the MP4 format, so it will be up to Ahead and other MP4 supporting companies like 3ivX and dicas to make this happen. Also, Recode 2 currently cannot split MP4 files, so if you're looking for a 2 CD rip, you'll have to find your own splitting solution (and there is no easy way) and there is no way to use Nero Digital outside of Recode 2.
You'll need the following software for this guide:
DVD Decrypter
& Daemon
Tools or an on-the-fly decryption driver like AnyDVD
or DVD Region-Free
Nero Recode 2
ImgTool & DVD
Decrypter or a commercial DVD burning program (if you prefer not to burn
using Nero Recode)
Step 0: First time setup
You'll only have to perform this step once. First time setup involves setting many parameters which then help to make subsequent DVD backup projects a lot easier.
To get started, you'll first have to select Recode's operating mode. As this guide is about Nero Digital, you should select Copy DVD to Nero Digital.
Press the More button to show Recode's options.
![]()
The first thing to look at are the profiles. You can define a number of profiles to select from. Profiles contain information like which movie items should be prioritized in terms of quality, and what audio and subtitle tracks will be included by default. Press Profiles.. to configure and create profiles.

 Press
the New button to create a new profile, or just go on editing the existing default
profile.
Press
the New button to create a new profile, or just go on editing the existing default
profile.
Set Quality distribution to the option you prefer. By default, Assign best quality to the Main Movie is selected, meaning that if you include extras or menus in the output (menus are not possible for Nero Digital output), the main movie will get more bitrate than the rest, and thus end up looking better. Of course, if the main movie is just distracting you from those wonderful extras, you could select Assign best quality to Extras ;)
Also only applicable for DVD output is the Keep all menus in original quality option, which does just what the name says: keeps the menu on their original form (and quality).
Then let's go to the audio tab:
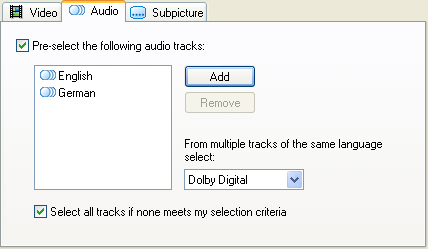 Here
you can select audio tracks that will be preselected for your output. Press
the Add button to add more languages, and select a language and press the Remove
button to remove a language again.
Here
you can select audio tracks that will be preselected for your output. Press
the Add button to add more languages, and select a language and press the Remove
button to remove a language again.
You can also select what type of audio is preferred by selecting the appropriate audio type from the dropdown box. By default, Dolby Digital tracks are preferred, but Recode allows you to select any other type of audio there might be. But on most DVDs, you'll have a Dolby Digital track. For DVD output, you could select DTS to preserve the high quality DTS track (but since it has a higher bitrate it takes always space that could otherwise be used for video).
Last but not least Select all tracks if none meets my selection criteria will lead to preselection of all available audio tracks, if none of the languages you've specified are actually present.
Then you can make the same language preselection for the subtitle streams and press OK to save your settings.
Then press the Configure button.
 The
first thing to configure are the DVD input options.
The
first thing to configure are the DVD input options.
The Prompt to include DVD data files when importing only applies to DVD output and can be used to include DVD-ROM files that might be present on the DVD in your final project.
Remove P-UOPs removes any user prohibitions that might be on the disc (such as ads you cannot skip, the impossibility to switch the language while watching the movie, etc.).
Remove Layer Break will remove the layer break that might be on a dual layer DVD.
Both Output DVD options only apply to DVD output.
Then proceed to Nero Digital.
 This
option obviously only applies to Nero Digital output.
This
option obviously only applies to Nero Digital output.
You can decide if Recode should ask you to perform a 2nd video encoding pass if the quality of the first pass isn't as impressive. Quite a good choice imho, but then again, Nero Digital is as fast that you're probably going to encode everything in 2 pass mode anyway.
The UI Options are not so interesting so let's proceed directly to the Preview Window tab.
 Recode
allows you to preview every video item with audio.
Recode
allows you to preview every video item with audio.
Set the Audio preview option to whatever best fits your current audio setup. Always downmix to 2-channel stereo will work everywhere, whereas Multichannel requires an analogue 5.1 audio output (and of course that output has to be connected to some speakers somewhere down the line ;) and SPDIF requires a digital connection between your PC and your receiver.
Now press OK to get back to the main Recode window.
Step 1: Ripping the DVD
As Recode does not support encrypted DVD content, you have to rip the DVD to your harddisk first. If you have AnyDVD or DVD Region-free installed, you do not have to perform this step as they allow Recode to rip and encode on the fly.
Step 2: Backup up the DVD
In the startup screen you have 3 options to choose from:
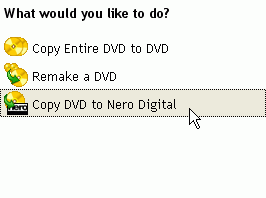 Copy
Entire DVD to DVD and Remake a DVD will produce DVDs, whereas Copy DVD to Nero
Digital is what you want to choose in this guide.
Copy
Entire DVD to DVD and Remake a DVD will produce DVDs, whereas Copy DVD to Nero
Digital is what you want to choose in this guide.
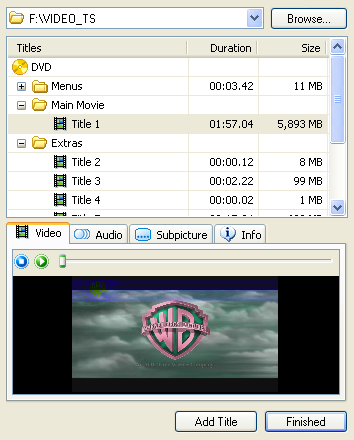
Press the Import Titles button to select your source.
![]()
 Initially,
this dialog will be rather empty and you'll have to press the Browse button
and select the source path of your DVD (the VIDEO_TS directory either on your
HD or DVD). If you're opening the DVD for the first time, Recode will quickly
analyze the source and show you the progress in the following window:
Initially,
this dialog will be rather empty and you'll have to press the Browse button
and select the source path of your DVD (the VIDEO_TS directory either on your
HD or DVD). If you're opening the DVD for the first time, Recode will quickly
analyze the source and show you the progress in the following window:
After the analyzation phase you'll get a listing of all video items available on the DVD, ordered by 3 categories: There's the Menus which are not interesting for Nero Digital output, the Extras and the Main movie. In case of an episodic disc you'd have multiple main movies all having about the same length. And if you have multiple main movies and the disc does not contain episodes, use the preview window to find out which Title you want to back up.
In the Info tab, Recode will also show you some more information about the video stream.
Once you've made your decision, select the appropriate title and press the
Add Title button. You can add multiple titles by repeating this procedure, then
press Finished to finalize the selection and get back to the main window.
Now you'll the list of titles that are going to be in your project:
 Be
default, Recode will automatically set the slider such that all titles will
fit onto the default size you've set:
Be
default, Recode will automatically set the slider such that all titles will
fit onto the default size you've set:
 Don't
forget that Recode doesn't split the output before you select a 2+ CD size though.
Don't
forget that Recode doesn't split the output before you select a 2+ CD size though.
If you uncheck Fit to target, you are responsible for adjusting the video bitrate
on your own. In order to help you achieve this, Recode has the size bar which
shows you the current size of your project in relation to the chosen media size.
![]()
As long as the blue bar doesn't cross the red dotted line, you're okay.
In case you have multiple titles, you can still remove any you don't like. Simply select it, then press the Delete button.
If you decide to manually configure the bitrate by moving the slider around (increasing the video bitrate for one title will automatically decrease the bitrate for the rest such that the output will still have the same size), you can also use the Lock Ratio button to finalize the bitrate for one Title. From that point on, the automatic size adjustment will no longer be active for the selected title and you'll see a small lock symbol in front of the appropriate bitrate slider.
![]()
To the left of the preview window and below the list of Titles, you can also configure the audio and subtitle options.
 By
default, the first audio track in your preference list (recall the setup in
step 0) will be included in your output (and you can't keep two audio tracks).
By
default, the first audio track in your preference list (recall the setup in
step 0) will be included in your output (and you can't keep two audio tracks).
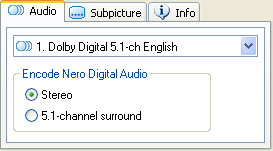
You can decide between 2 channel (Stereo) and 6 channel audio (5.1-channel surround). Keep in mind that in order to use 6 ch audio, you'll need an analogue 5.1 output that is hooked up to your speaker system. SPDIF will NOT work!
In the subtitle tab you can also decide on a subtitle track that will be included in the output (once again only one track is possible).
Before we go into detailed audio and video configuration, there's also the Start/End
feature.
![]()
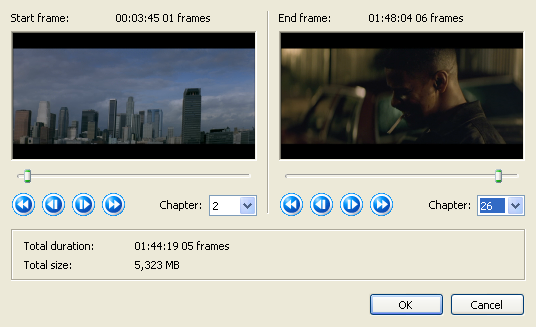 If
you rather not include the entire movie, you can set a start and end point manually
in this screen.
If
you rather not include the entire movie, you can set a start and end point manually
in this screen.
The usage is pretty straightforward so I doubt you'll have any problems.
Back in the main screen let's configure audio and video.
![]()
 In
this screen you can configure both 2ch and 5.1 ch output by selecting the appropriate
option from the Audio channels dropdown list.
In
this screen you can configure both 2ch and 5.1 ch output by selecting the appropriate
option from the Audio channels dropdown list.
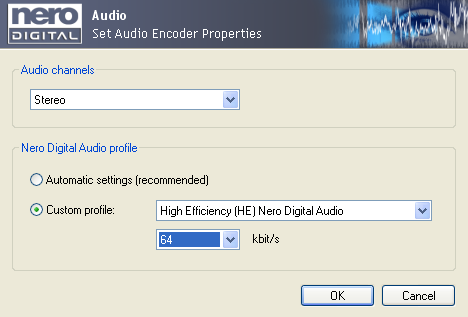
Recode will pick a bitrate by default, but you can manually configure it by selecting Custom profile. Using the High Efficiency Nero Digital Audio codec enables high quality low bitrate audio encoding, but not all AAC players can handle it (though if you have the Nero player, the 3ivX filters or CoreAAC installed that won't be a problem).
The bitrate should be self-explaining. Using HE AAC you can use 64kbit/s and while it won't sound as good as 128kbit/s MP3, it gets pretty close (and of course you can still increase the audio bitrate).
For 6 ch audio, a bitrate of 256 kbit/s is suitable.
The next step is the video setup:
![]()
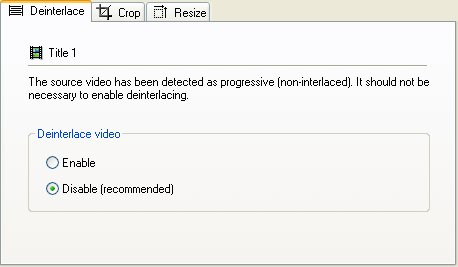 The
first option is deinterlacing. Recode automatically detects if the source needs
it and select the appropriate option so you should not interfere here unless
you know that the decision is wrong (for instance if you see horizontal lines
in the preview window and deinterlacing is disabled, you should enable it).
The
first option is deinterlacing. Recode automatically detects if the source needs
it and select the appropriate option so you should not interfere here unless
you know that the decision is wrong (for instance if you see horizontal lines
in the preview window and deinterlacing is disabled, you should enable it).
 Then
we have the crop options. As competing programs, Recode will automatically crop
away black bars. If you think you can do it better on your own, select Custom
Crop and press the Custom Crop Interface button.
Then
we have the crop options. As competing programs, Recode will automatically crop
away black bars. If you think you can do it better on your own, select Custom
Crop and press the Custom Crop Interface button.
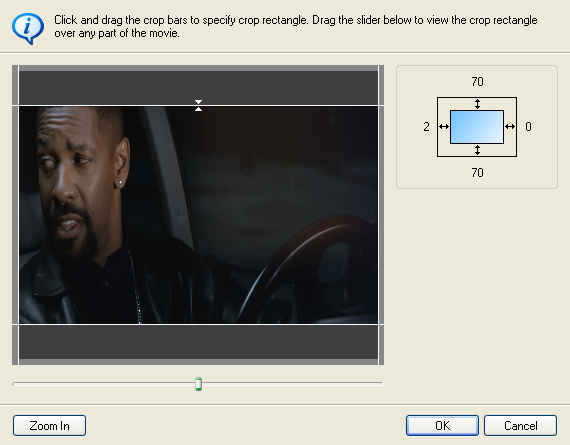 You
can use the slider below the image to go to anther position in the movie, and
then use the white lines around the movie to set the actual crop position.
You
can use the slider below the image to go to anther position in the movie, and
then use the white lines around the movie to set the actual crop position.
Your actual crop settings will also be shown to the left of the movie preview.
Press OK when you're done.
Last but not least there is the Resize tab, where you can also set a custom
size, but keep in mind that Recode doesn't automatically adjust the resolution
such that it still corresponds to the proper aspect ratio. So, if you change
either resolution, make sure you adjust the other as well to preserve the proper
relationship between horizontal and vertical resolution.
Once you have configured both video and audio, we're almost ready for encoding. Before pressing the Next button, select the appropriate Nero Digital profile from the dropdown list:

There are several profiles that target specific hardware devices. The Home Theater profile is the most suitable and targets standalone DVD players (but keep in mind that currently no player can handle MP4, AAC and the subtitle format used by Nero Digital). Selecting HDTV or Maximum Definition allows you to select more advanced features later on. Since you can currently only play the output on PCs anyway, select the Maximum Definition profile, then press Next.
By default, Recode wants to go directly to burning, but you'll want to configure some more first, so select Nero Digital Settings.
By default, Recode only shows you a selection between one pass and two pass encoding. Two pass encoding obviously takes longer (not quite twice as much because the audio is only encoded once), but also yields better quality.

It is also here that you can change existing profiles or create new profiles by selecting a profile from the list and change its options, or press the New button to create a new one.

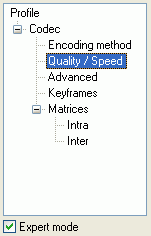
Check the Expert mode checkbox and you'll get access to the advanced settings, which are structured in a tree like structure:
 The
Encoding method corresponds to the options available in the easy mode. In one
pass mode you can also set a minimum and maximum quantizer (compression factor)
if you want, but using the entire range (1-31) is usually fine.
The
Encoding method corresponds to the options available in the easy mode. In one
pass mode you can also set a minimum and maximum quantizer (compression factor)
if you want, but using the entire range (1-31) is usually fine.
In the Quality / Speed section, the fun begins:
 when
using one of the predefined Performance / Quality ratios, most options will
be grayed out, which is just fine. Setting Performance / Quality to Custom allows
you to configure everything, but be careful: you should really know what those
modes do.
when
using one of the predefined Performance / Quality ratios, most options will
be grayed out, which is just fine. Setting Performance / Quality to Custom allows
you to configure everything, but be careful: you should really know what those
modes do.
EPSZ2 is the default higher quality motion search method and NC Prediction is not useful for PC based encoding.
Scene cut configures the automatic keyframe insertion at scene changes.
Fast ME enables a faster and lower quality motion estimation that should not be used for DVD backups.
The Low Noise and High Noise options can be used to optimize the encoder for slightly or highly noisy sources but normally you don't need those options.
High BVOP quantisation enables higher compression for B-frames which can degrade quality.
The Maximum MV Range can be used to increase or decrease the search range of the motion estimation. The option decides how far an object can move between frames and still be recognized. Higher values are better but also degrade performance because a larger area of the picture has to be searched.
Finally, the Psycho-Visual quality level use properties of the human visual system to leave out things we wouldn't see in order to have more room for details we can actually spot. The High mode is the default, and operates on a macroblock level, whereas the Low mode operates at a frame basis (and is thus less accurate but faster).
The next batch of interesting options can be found in the Advanced options.
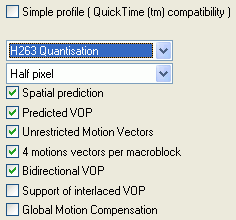 Keep
Simple profile unchecked or you won't have access to many of the advanced
features Nero Digital offers.
Keep
Simple profile unchecked or you won't have access to many of the advanced
features Nero Digital offers.
Then you can switch between H.263 and MPEG Quantisation. The former option gives a somewhat softer image and is better suited for smaller filesizes (1 CD), whereas MPEG is more suited for larger sizes (2 CDs and above).
Then there's the motion estimation. Half pixel is the default, Quarter pixel enables a more accurate motion estimation, which decreases encoding speed but can help image quality (although not everybody likes the effect QPel has). Note that QPel is not available in the Home Theater profile (and below).
Spatial prediction enables dc/ac prediction which reduces the bits necessary for intra macroblock coding by looking at good predictors in surrounding macroblocks.
Predicted VOP should be checked in every case, as without it your quality is going to be degraded as every frame is encoded independently (MPEG compression is based on the idea of only storing the difference between frames to keep the filesize down).
Unrestricted Motion Vectors allows object tracking outside of the frame, which leads to a better motion estimation.
Check 4 motions vectors per macroblock to use more motion vectors and thus increase quality somewhat.
Bidirectional VOP is the more scientific notion of B-frames, and you can safely turn this on as well to increase quality.
Then we have Support of interlaced VOP, which would support encoding interlaced content (that is if the Deinterlace option hasn't been enabled), and Global Motion Compensation (this is 3 warppoint GMC which currently no standalone player can handle, and the option doesn't really improve quality notably).
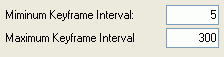
In the Keyframes section you can set a minimum and maximum distance between keyframes (that is frames that are encoded as a whole, not as difference to other frames). The default work just fine though and with today's auto keyframe insertion mechanisms you should not have to reconfigure those options.
Finally, it is also possible to use custom quantization matrices for both I-frames (Intra) and P-frames (Inter). But if you know what quantization matrices do, you'll probably not need a guide anyway and won't have any problems handling them on your own.
Once you've gone through the expert settings, a few more things before you can start encoding:
Recode can automatically shut down your PC when encoding is done. All you have to do is check Shut down computer when finished.
![]()
If you plan on using your PC while Recode is encoding, also set Priority to Low. If you're not using your PC, Low can't hurt either, as you won't notice a difference in speed.
![]()
Now it's time to go to the Burn Options.
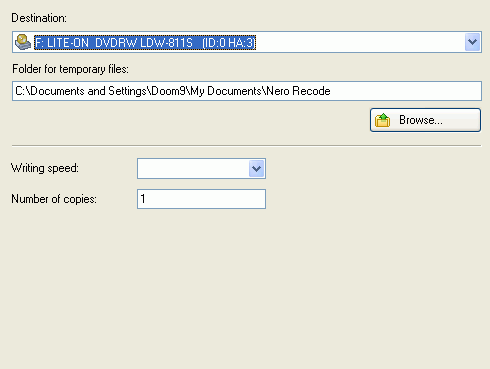 You
have the choice between writing to your harddisk (select Hard Disk Folder
and a Target folder), burn directly to a CD / DVD by selecting the a
CD/DVD burner and the appropriate Writing speed and Number of copies
you want to burn.
You
have the choice between writing to your harddisk (select Hard Disk Folder
and a Target folder), burn directly to a CD / DVD by selecting the a
CD/DVD burner and the appropriate Writing speed and Number of copies
you want to burn.
The 3rd option is Image Recoder, which would create a CD image file to your harddisc, which you can burn to a CD at a later point.
In every case, you'll have to select a folder to either store the output files, the CD image or temporary files (in case of burning). Make sure there's enough space left on the device you select.
Then it is finally time to get started. Press the Burn button.
![]()
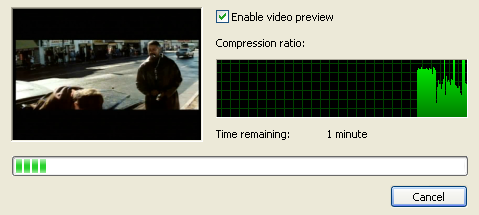
 Recode
will show you a preview of what is currently being encoded (that you can switch
off and should switch off to get a slight speed increase), and of course there's
the status indication where you get to see the actual number of frames encoded
per second, the elapsed and remaining time and progress bar with percentage
indicator.
Recode
will show you a preview of what is currently being encoded (that you can switch
off and should switch off to get a slight speed increase), and of course there's
the status indication where you get to see the actual number of frames encoded
per second, the elapsed and remaining time and progress bar with percentage
indicator.
Once encoding (and burning) is done, Recode will show you this friendly message.
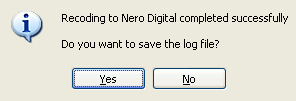
If you're interested in knowing what Recode did, press Yes.
Then press Next and you get to a screen where you can burn the project again, start a new project or design a cover for your project.

In case you haven't burned the project, simply create a regular CD ISO project in Nero 6 at any point, add the MP4 file to the project and burn it whenever you feel ready for burning.
This document was last updated on December 10, 2003