Due to hardware issues I wasn't the first one with an actual guide but I still think you might be interested in knowing how to properly do it.
First of all let's clear up some of the Microsoft hype: While the files really got smaller (around 10-20% I'd say and the quality also got better there's simply no way that a 500kbit/s movie would look even close to an actual DVD and the same applies to 750kbit/s files). And if 64kbit/s WMA audio really sounds as good as a CD is also highly doubtful. Nevertheless Microsoft is the only company that actually managed to come in better than DivX. Currently the encoding process is still a lenghty one and involves the use of a command line interface (or a GUI) but that will eventually change in the final version. But clearly multipass encoding (which is suggested due to the superior image quality you get compared to the other encoding modes) takes a lot longer than your average DivX movie. Another problem that has existed for quite some time is that you can't edit Microsoft's proprietary formats. In order to get around the problem you have to cut the encoding into parts so that you get files that will approximately fit on your CDs. Again WM8 lets us down when it comes to accuracy. The lower the bitrate the more precise you can calculate the resulting filesize but if you go higher than 1500kbit/s the results become worse and worse and you will never even get an average bitrate of 3000kbit/s (unless you have a clip that has only the most demanding action scenes over and over again). After this small introduction let's begin..
The first step is to properly set up a frameserver using DVD2AVI, which output we'll then process according to our needs and finally serve into the Windows Media Encoder Util.
Step 1: Set up DVD2AVI Frameserving
Since there's no good WMV splitter you might want to limit the range of the DVD2AVI decoding in order to make a part fit a CD.
Step 2: Audio extraction
Since DVD2AVI's audio encoding is still prone to create asynch output we'll trust the directShow architecture here. Depending on your needs you can make a WAV (for VCD/SVCD) or MP3 (for DivX).
Step 2a: Audio extraction (alternative)
If Vob2audio should let you down or if you have a PCM soundtrack (vob2audio can't handle these, since the Ligos splitter only accepts AC3 and MP2 soundtracks) you'll have to create your own graph in Graphedit. Create a WAV or MP3 depending on your needs.
Step 2b: Add RIFF Header to MP3
Start wavemp2, press WAVE, select your MP3 file and you'll soon have a perfectly nice MP3 with a header so that it can be used by any application which can read WAV files.
Step 3: TMPG frameserving
Start up TMPG, load your DVD2AVI project file and wav file you got from vob2audio/graphedit.

The press settings.
 Enter the desired size of your movie, and select 23.976 as framerate (or 25fps in case of a PAL source). The rest of the options is of no importance since we're only using TMPG to resize, crop, cut the movie into pieces (you can't edit WMV files after creating them) and perform IVTC if needed.
The size can be calculated according to the rules in the bitrate and resolution guide.
>> Read more about
RESOLUTIONS
Now go to the advanced tab.
 Select the right video source type according to the information DVD2AVI gave you (if frametype was interlaced all the time then select interlaced here as well ... and you'll have to deinterlace in that case instead of performing IVTC so double click on Deinterlace and select the option that you think looks best).
Double click on source frame, use the set start frame and set end frame buttons to mark the beginning and end of your movie (should you aim for a size larger than one CD that is, clearly you don't need to split for a one CD rip). Then perform the IVTC if needed and in the end enable clip frame and crop the black bars.
You have to chose another Source aspect ratio if you have another source (the image displays an NTSC 16:9 source). Chose 4:3 NTSC/PAL for non 16:9 movies and 16:9 PAL for 16:9 PAL movies.
You can use File - Preview to preview the output you'll get.
>> Read more about
IVTC
CROPPING
When everything has been done go back to the main window and press File - Save, then go forward to step4.
Step 4: Create an AVI
Step 5: Encode
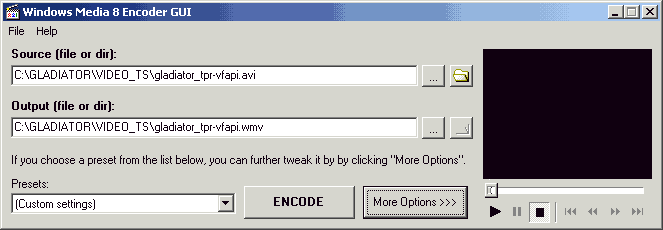
In the end start up a GUI for the Windows Media encoder or use the command line interface. But I assume that all of you who use the CLI version don't have to be told how to use it so we stick to the GUI.

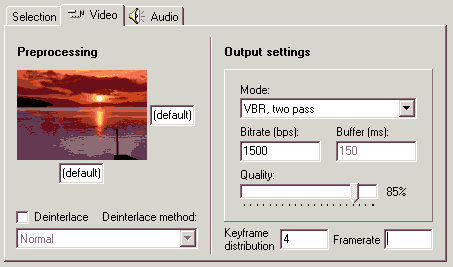
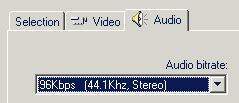
Then press the more options button and configure the video and audio settings:
 Select a bitrate, set the buffer to 150ms and select 2 pass VBR encoding (all other options look worse). Keyframe distribution stands for the keyframe interval.
 Here you can select the sampling rate and bitrate of the audio. Keep in mind that wma sounds a bit better at the same bitrate than mp3 so you can actually choose a lower setting than you would with mp3. Also note that the audio has to be downsampled by dvd2avi if you choose a 44.1KHz setting.
When everything has been done start encoding. Then repeat the whole process for the 2nd project file you have created when splitting the input file (provided that this case applies to you).
The resulting file can be watched in both WMP6.4 and WMP7. The player will simply connect to the Microsoft server and download the necessary codec for playback. In order to achieve better playback in WMP7 you should increase the cache settings.