
Encoding
Right click again, and select Project options from the menu this time.
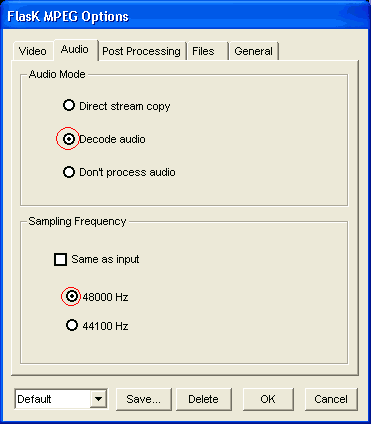 The program, as its predecessors, has the nasty habit of selecting the wrong samplingrate for audio. Therefore uncheck Same as input and check 48000 Hz.
Next go to post processing.
 As we're going to encode in DivX which is in YUV12 colorspace make sure you check YUV12 for DivX ;-) as video format. If you get an error message that overlay couldn't be initialized, don't worry. You will not see the preview during encoding but otherwise everything is still fine.
Also, if your DVD is 16:9 (most are) verify that the marked 16/9 is selected. In certain cases this detection will falsely say 4:3 even thought he movie is 16:9 (2 examples: ID4 and Tomorrow Never Dies). In this case just select 16:9 here, otherwise the resizing will be off.
Also set Pixel Aspect to 1:1 (VGA). The other two settings are for (S)VCD and miniDVDs.
In Filtering the Bressenham filter seems to offer the best quality/speed ratio.
Do not enter any values in the crop and letterboxing settings, instead press the Show Output Pad button to configure this graphically which makes the whole process much easier.
 First of all let's reset the settings by pressing the >> button on the lower right and select Reset settings from the menu that comes up. Then press the marked -16 button to get to the desired with for your rip. Use a value between 512 and 640, depending on the lenght of the movie and the bitrate. Personally I try to get every rip between 576 and 640, I start with 640 and if the quality is not good I try again using a lower value. As you can see you can still select another resize filter under Options, as well as change the Aspect ratio of the input source. Here I've tried BiCubic as filter but I'd go with Bressenham unless you're sure that another filter is clearly better.
Once you've done that check Crop.
Now if you press the >> button on the lower right of the Output pad you'll get to the cropping options.
 Select AutoCrop.

Automatic should to the job just fine. If a very dark picture is currently showing simply move the slider in the Output pad and try again. If you're not happy with the auto-selecting you can try the Don't let black borders! or Don't crop the picture! buttons which will not leave a single pixel of black at the edges and not cut into the picture respecitvely.
In the end you'll get something like this, note the output resolution which is shown in the 3rd line and the dotted blue lines which mark the part of the picture that's going to encoded.

Press the "OK" button to close the output pad and then go to the General tab.
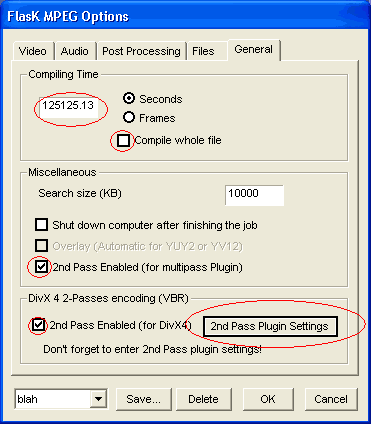 In order to enable automatic 2 pass encoding we have to uncheck Compile whole file and enter the lenght of the movie in seconds. How to find out that number? Play the DVD ;)
Then check 2nd Pass Enabled (for multipass Plugin) and 2nd Pass Enabled (for DivX4) and last but not least press on the 2nd Pass Plugin Settings button.

Here set up your audio codec, check Compensate Fraunhofer-IIS's MP3 codec bugs which should prevent getting asynch audio. Then select the DivX4 codec from the dropdown list. You'll then get the following window:

Only the selected stuff is important. Set Variable bitrate mode to 2-pass, second pass, set your bitrate and last but not least set the logfile for the first pass. This will be an approximately 30mb large text file containing information about the first pass (the AVI file created during the first pass will be very small and not usable). Write down the path and name of this file, you'll need it again. Then Press OK to close this window and the "OK" button to close the plugin configuration and then OK again to get back to the main window.
Right click again and this time select Output plugin selection (that's the 3rd option) and select the OpenDML AVI output (RGB, YUV), then go via the same menu again but this time select the 4th option:

You'll be presented with the same codec configuration.
Select the DivX4 codec again.
 The only thing you have to change is to set the Variable bitrate mode to 2-pass, first pass. Do NOT forget to do that or you'll be in serious trouble. Also verify that the logfile name and path match what you entered before.
Then press OK twice to get back to the main window.
Then right click and go to our famous menu again and this time select the bottom option (Start Conversion)

This screen will come up and you'll see the status of the encoding session. If you intend to use your PC otherwise during the conversion process you can lower the priority so Xmpeg will only take whatever CPU time is left.
After the progress has reached 100% it will start all over again. Don't worry, that's how it's supposed to be. In the end you'll end up with the already mentioned logfile and 2 AVI files, a small one called xxy_1st_pass.avi and xxy_2st_pass.avi. You can delete the former and keep the latter, it's what you want.
>> BACK