After everything is installed properly you have to enable the capture driver in order to show VirtualDub which source you are intending to use. Therefore, you have to open the TV application that came with your card. Afterwards you have to set the channel you want to capture and close the application again. If, as recommended, the tuner of the VCR is used, it has to stay switched on for the whole time of the capture process (of course).
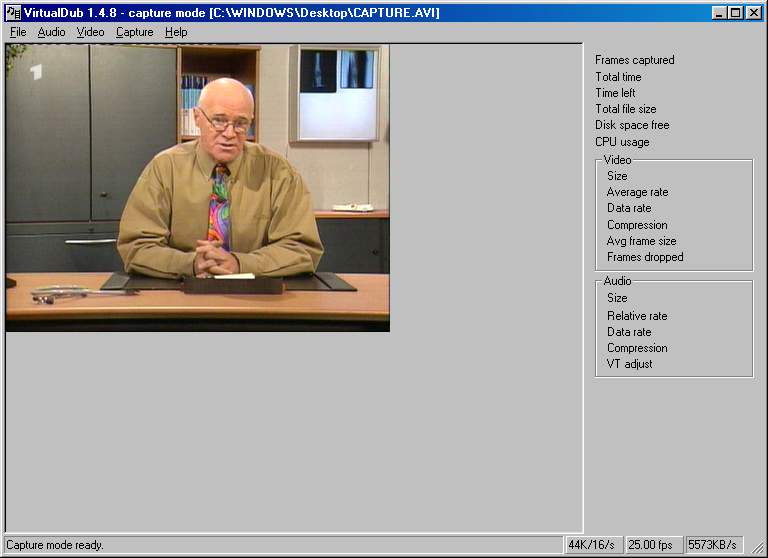
Now you have to open VirtualDub and switch to Capture Mode:
File -> capture avi
Now you should be able to see the appropriate picture in the preview:

General Settings
You should choose the following settings. They do not depend on the codec you are going to use later:
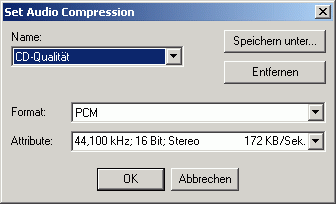
Audio -> Compression -> in the dropdown box labeled 'name' you should choose CD-quality.

Audio -> Volume Meter
If both the left and right channels are displayed similar to the screenshot below, you've got stereo sound and are all set. Now you have to choose the desired volume by moving the volume slider to the appropriate position (the slider should almost always be to the very left). If the audio is missing completely, you should check the settings to verify that Line In is selected as the audio source.

Video -> Overlay using WDM drivers (e.g. XP), Philips based cards.
Video -> turn off Overlay and Preview using VFW drivers, with BT8x8 chips.
Capture -> Settings
Set the framerate (PAL) to 25, set the buffers as shown in the screenshot below, and activate "Lock video stream to audio".

Capture -> Timing -> activate "resample audio data dynamically to match video clock".
this way you can avoid dropped frames, even if the audio and video are not running in sync. You will still end up with a sync'ed file.
Because of this modification written by Andreas Dittrich, dropped frames are almost extinct. More information on this topic can be found in the Capture-FAQ on Doom9.org, and this article by Mattheo ( translator: German only).
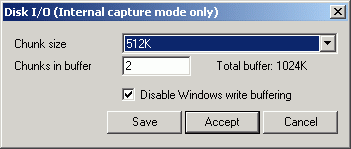
Capture -> Disk I/O
In this small window you can match VirtualDub to your computer's hard drive speed. I got tired of frequently switching these settings so I just leave the defaults. The "Chunk size 1 MB" and "Chunks in buffer 15" are good for hard drives with a 2MB cache. In the forum I've read that somebody with an 8MB cache drive has achieved best results choosing "Chunk size 512 KB" and "Chunks in buffer 16", but generally this is the all-too-well-known 'trial and error' game (again).
It is important to check "Disable Windows write buffering" just to make sure Windows does not have a chance to interfere.

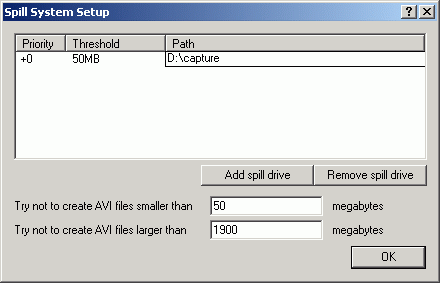
Capture -> Capture Drives -> add spill drives.
Short explanation: An avi file cannot get larger than 2 GB, even if win98 (FAT32) can handle files as large as 4 GB and WinXP/2K (NTFS) can handle files of almost any size. So you have to tell VirtualDub that it should simply split the files every time it reaches 2 GB. That is what spill drives are for; they allow the files to be loaded later as one logical file again. This ingenious idea by Avery Lee puzzles even large (and expensive) suppliers of capture software.
Fortunately we just have to click "Add spill drive" once, choose the appropriate path where you have sufficient disk space, and click OK (see screenshot).

Video -> Enable Multisegment capture
To set up the spill drives (which you've just done) is not enough though. You've also got to enable them.
Choosing the resolution
To proceed further you now have to make your final decision. Once again, here are your options:
1/4 PAL (384*288) or direct VCD at 352*288
"1/2 PAL" (384*576 with vertical resize)
Full PAL (7xx*576) or direct SVCD at 480*576
Back to the index: <HOME>
Last edited on: 01/12/2003 | First release: n/a | Author: BaronVlad | Translator: SteVe(killingspree)| Content by Doom9.de